
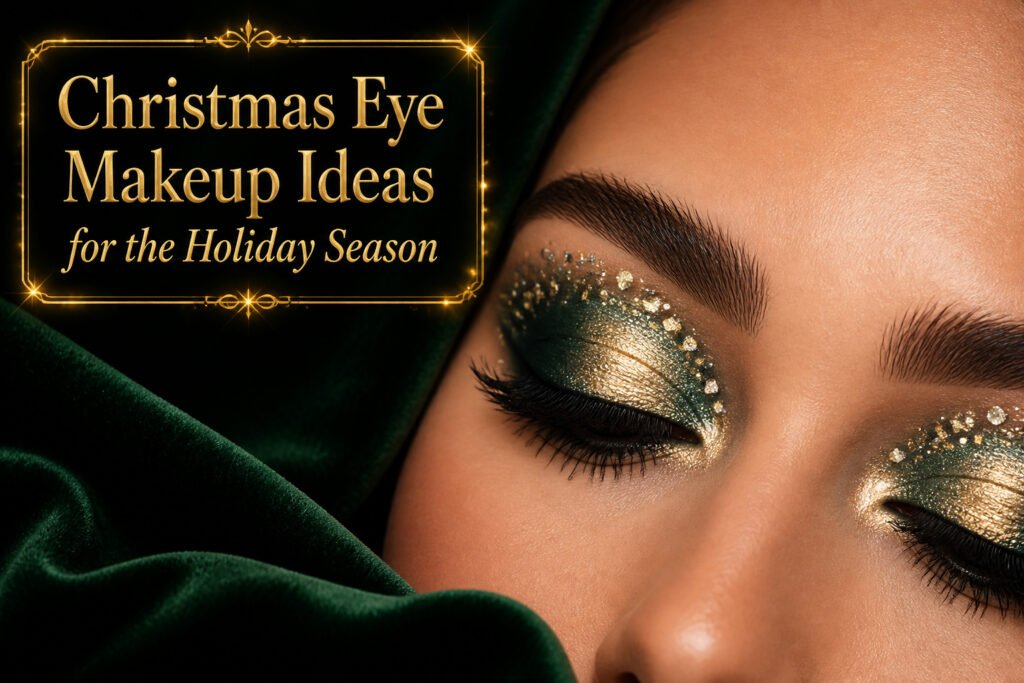
Christmas eye makeup for 2026 ranges from a restrained champagne shimmer to full lid art with string-of-lights detail, and the deciding factor is how much time you have before you walk out the door. The difference between a look that holds and one that collapses by dessert usually comes down to one step most people skip: a cream base or primer that gives pigment something to grip. The Morphe 35b palette carries reds that stay crimson instead of pulling pink, but even those need that first layer to survive a warm room.
1. Irresistible Christmas Red Eye Makeup
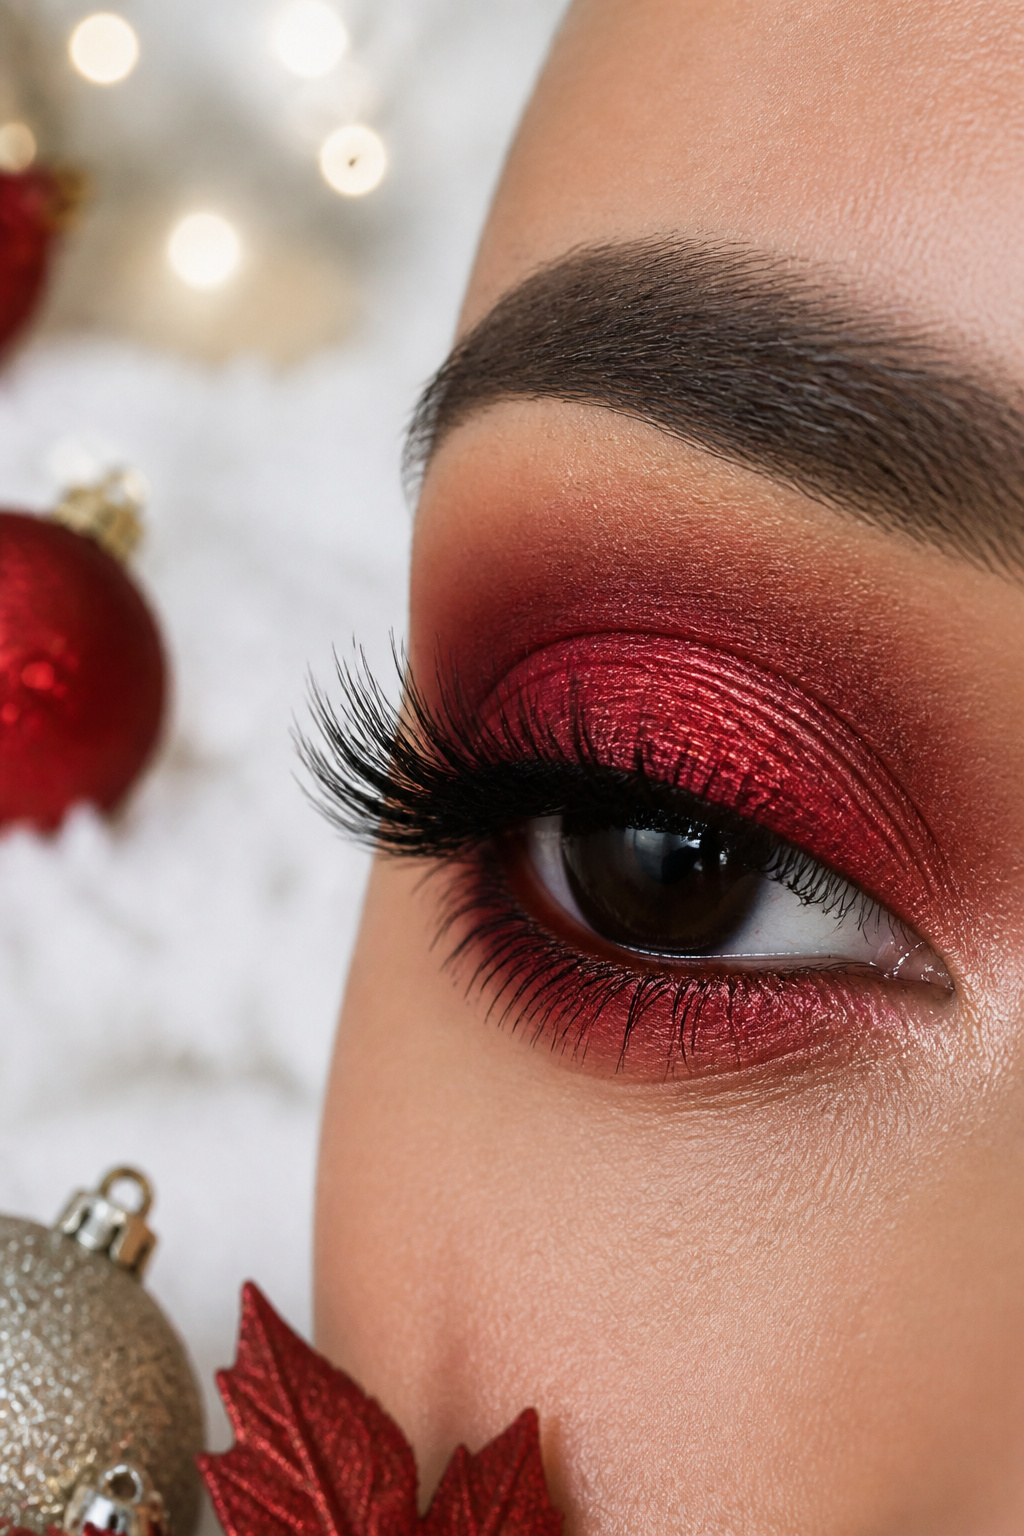
Red eye makeup for Christmas walks a narrow line. Go too light and the shade shifts to pink within an hour; go too bright without structure and you look ready for a stage, not a party. The fix is to build the pigment in layers rather than sweeping red straight onto bare lid, which almost always turns patchy by hour two.
Start with a cream red base across the mobile lid, then press a powder shadow on top to set the color and add depth. The Morphe 35b palette carries true reds that stay crimson instead of pulling pink, which is the usual problem with holiday reds. Keep the crease grounded in warm brown so the look reads festive but still anchored. Skip the shimmer in the socket; a matte brown there keeps the red from floating off your face.
2. Elegant Blue Christmas Eye Makeup
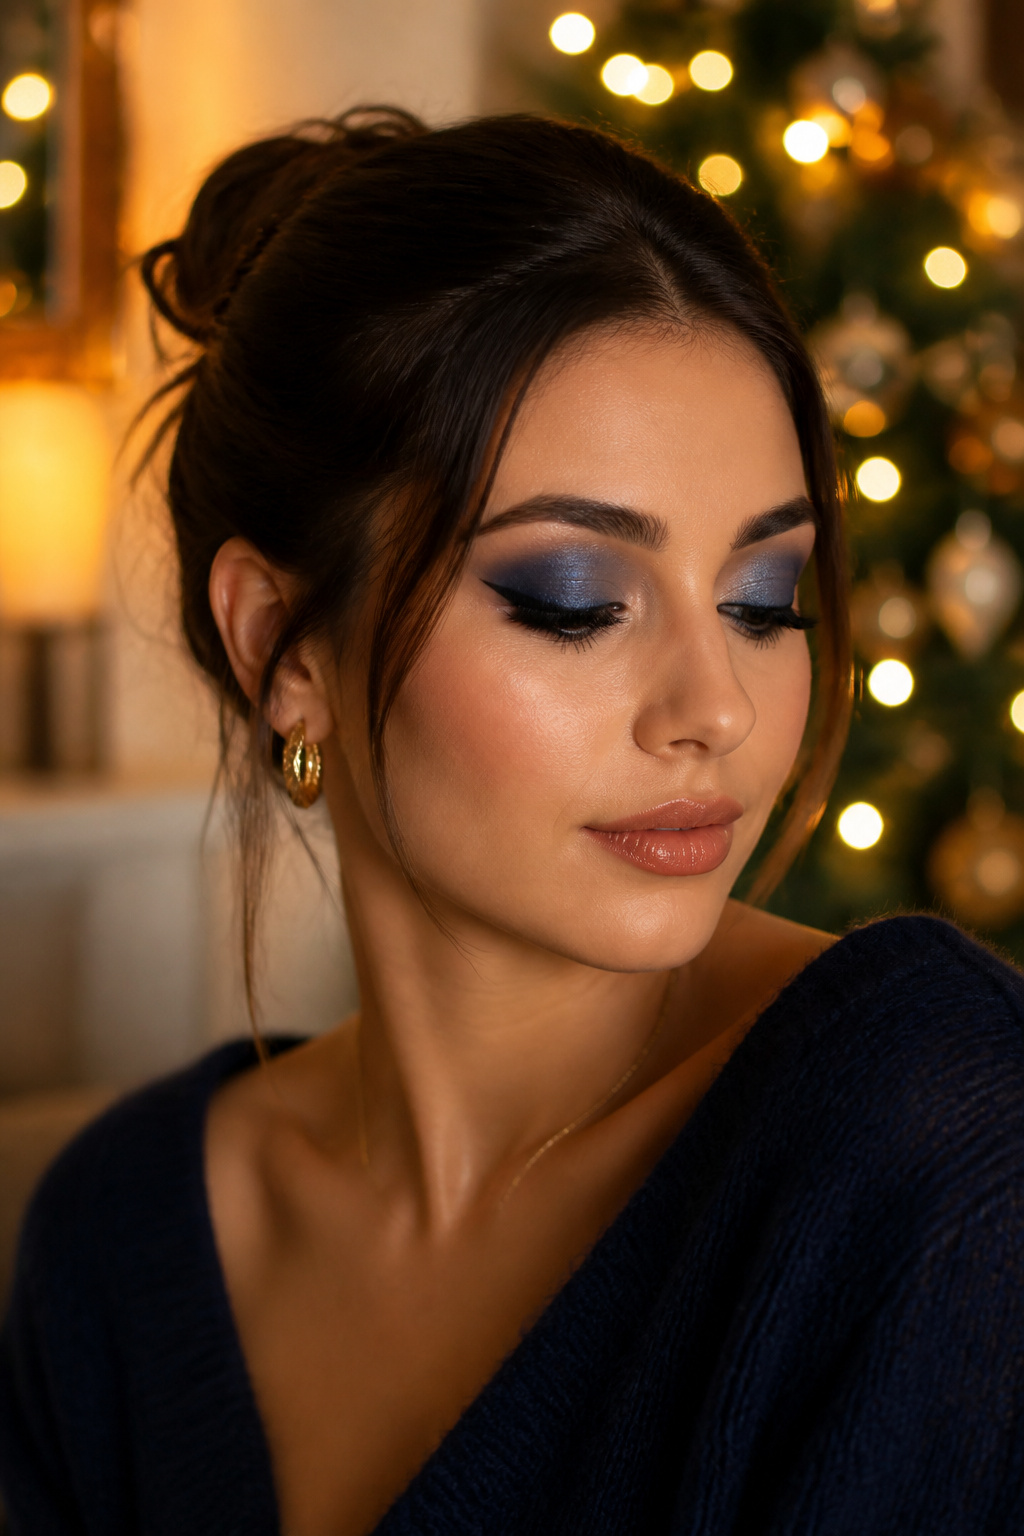
Navy blue carries the night better than black at a Christmas party; it stays rich under dim lights without flattening into a silhouette. Start with a dark blue cream shadow across the lid and into the crease, then press a matching powder over it while the cream still has a slight tack. The powder grips instead of dusting onto your cheek, and you build depth in thin layers rather than one opaque swipe that creases by dessert.
A crisp wing sharpens the shape without fighting the blue for attention. The Revlon ColorStay Liquid Eye Pen lays down a line that stays put through hours of talking and warm rooms. Let the wing angle follow your lower lash line’s natural upward tilt; anything steeper reads costume.
Do not run blue along the lower waterline alone. It shrinks the eye and gives a tired, bloodshot look that no amount of sparkle above will fix. If you want definition below, keep it to the outer third of the lower lash line with the same navy powder, or skip it and let the upper wing do the work.
3. Bold and Beautiful Black Eyeshadow
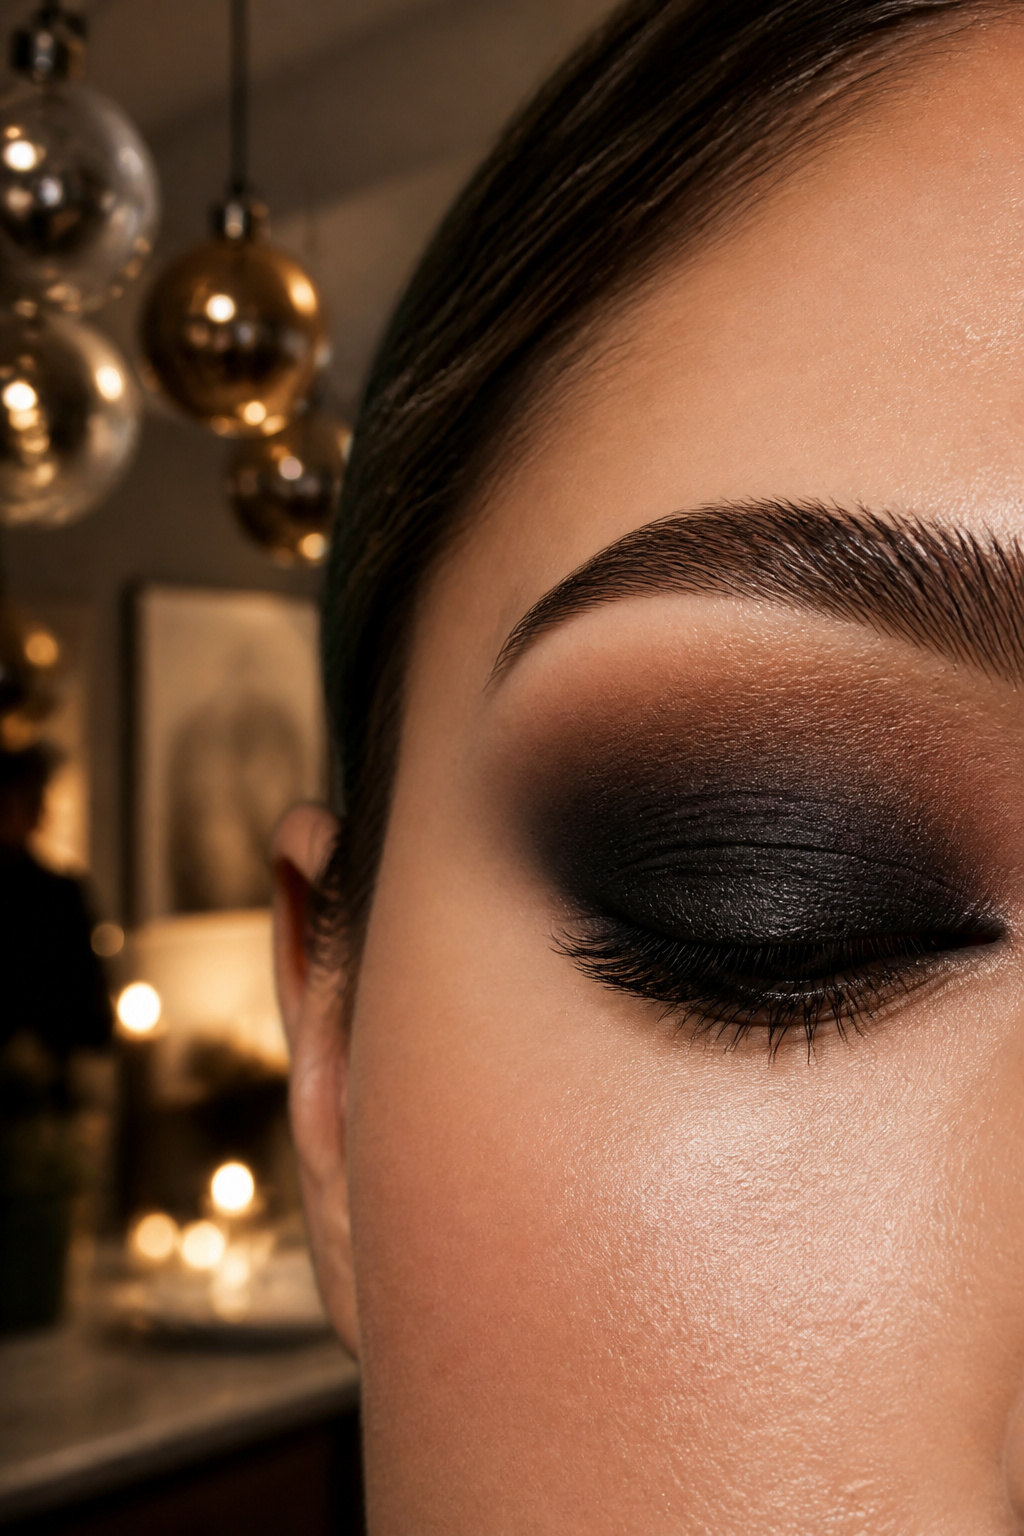
A smoked-out black eye reads holiday when you build it from texture, not from glitter or color. Start with a black cream base across the lid. That density gives powder something to grip, and it keeps the tone true instead of drifting gray. Let it set for thirty seconds, then press a matte black shadow on top with a flat brush.
The edge work is what separates this from a bruised look. Take a clean fluffy brush and a neutral transition shade two tones above your skin, and work in small circles where the black meets bare skin. No additional black on that brush; you are diffusing, not deepening.
Tightline the upper waterline with Rimmel London Colour Precise Eyeliner. That fills the gap between lashes and lid so the lash line looks thicker without a visible stripe of liner above it.
The common mistake is packing black shadow straight onto a bare lid. The oils in your skin grab the pigment unevenly, and within an hour you have a gray, muddy lid with no depth and no shape. The cream base prevents that entirely.
4. Brilliant Green Glam Eye Makeup
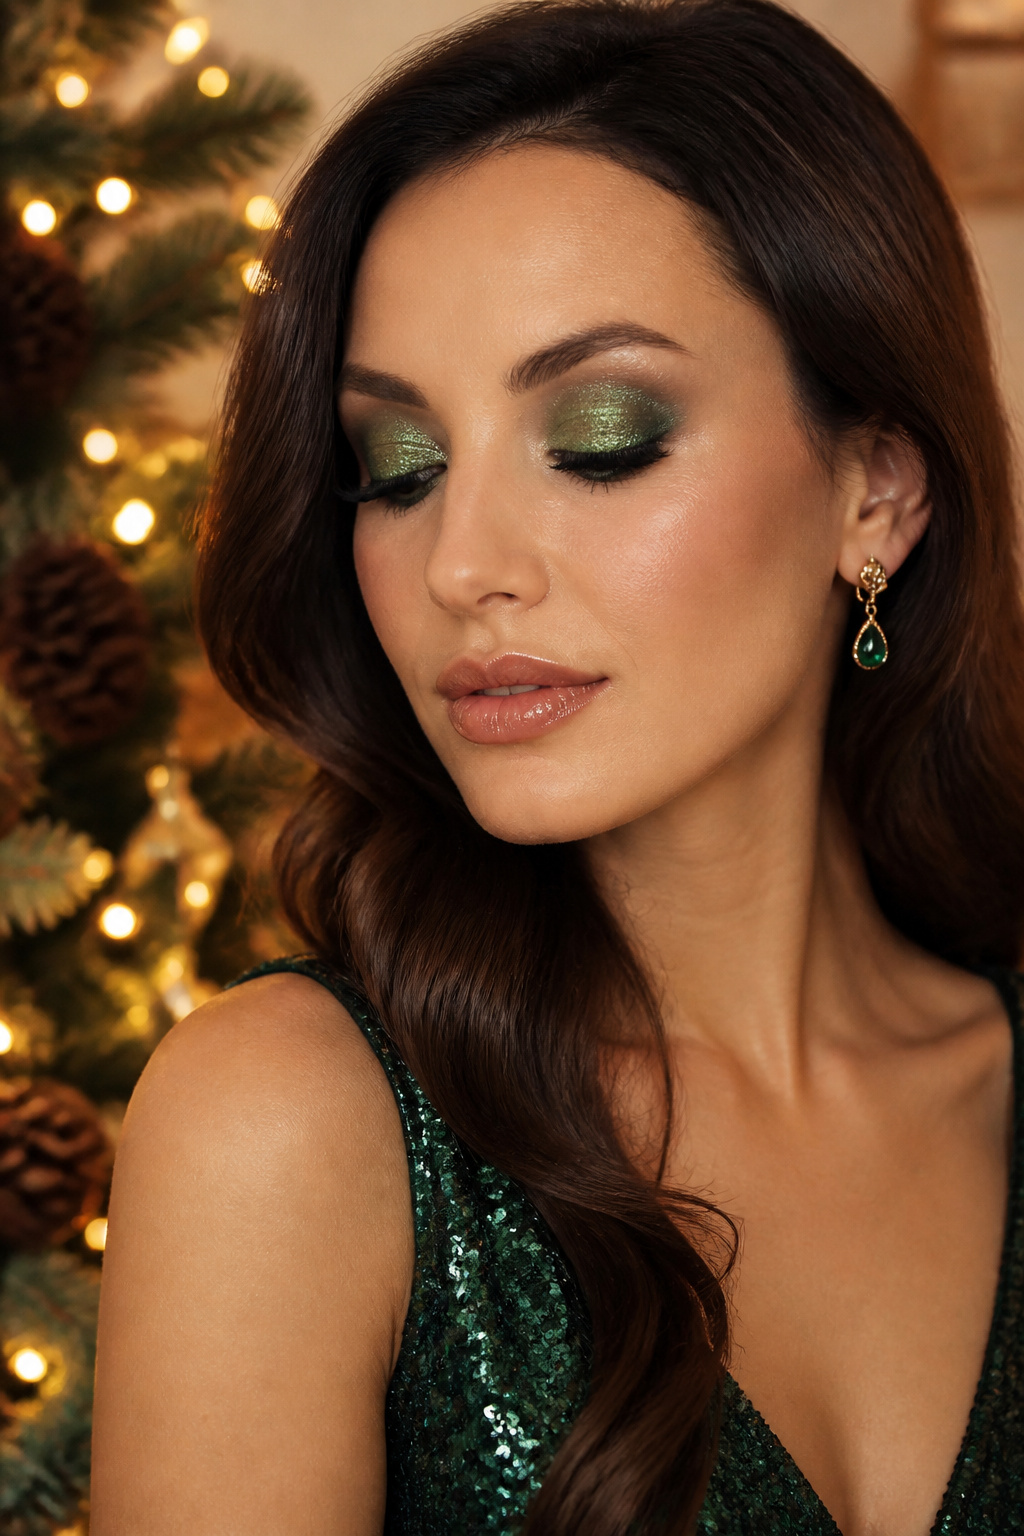
A green cream base changes how metallic shadow sits on the lid. Paint it on thin and even, then wait until it sets slightly tacky before you move to powder. Press shimmer shadow onto that sticky surface with a finger, not a brush, and the pigment comes up almost foil-like instead of scattering across your cheek.
The De’Lanci palettes carry greens dense enough for this, opaque straight off the pan without building in five coats. You want that saturation because a washed forest green goes muddy fast.
Keep the brow bone matte and neutral, bone or soft taupe. The second that shimmer climbs toward the eyebrow, the whole look shifts into costume territory. Same problem with blending the green itself too high. Stop the color at the crease, or just below it if your lid space is deeper. Carry it higher and you lose the eye’s natural shape; the green becomes a mask rather than a frame.
5. Rocking Pink Neon Eye Makeup
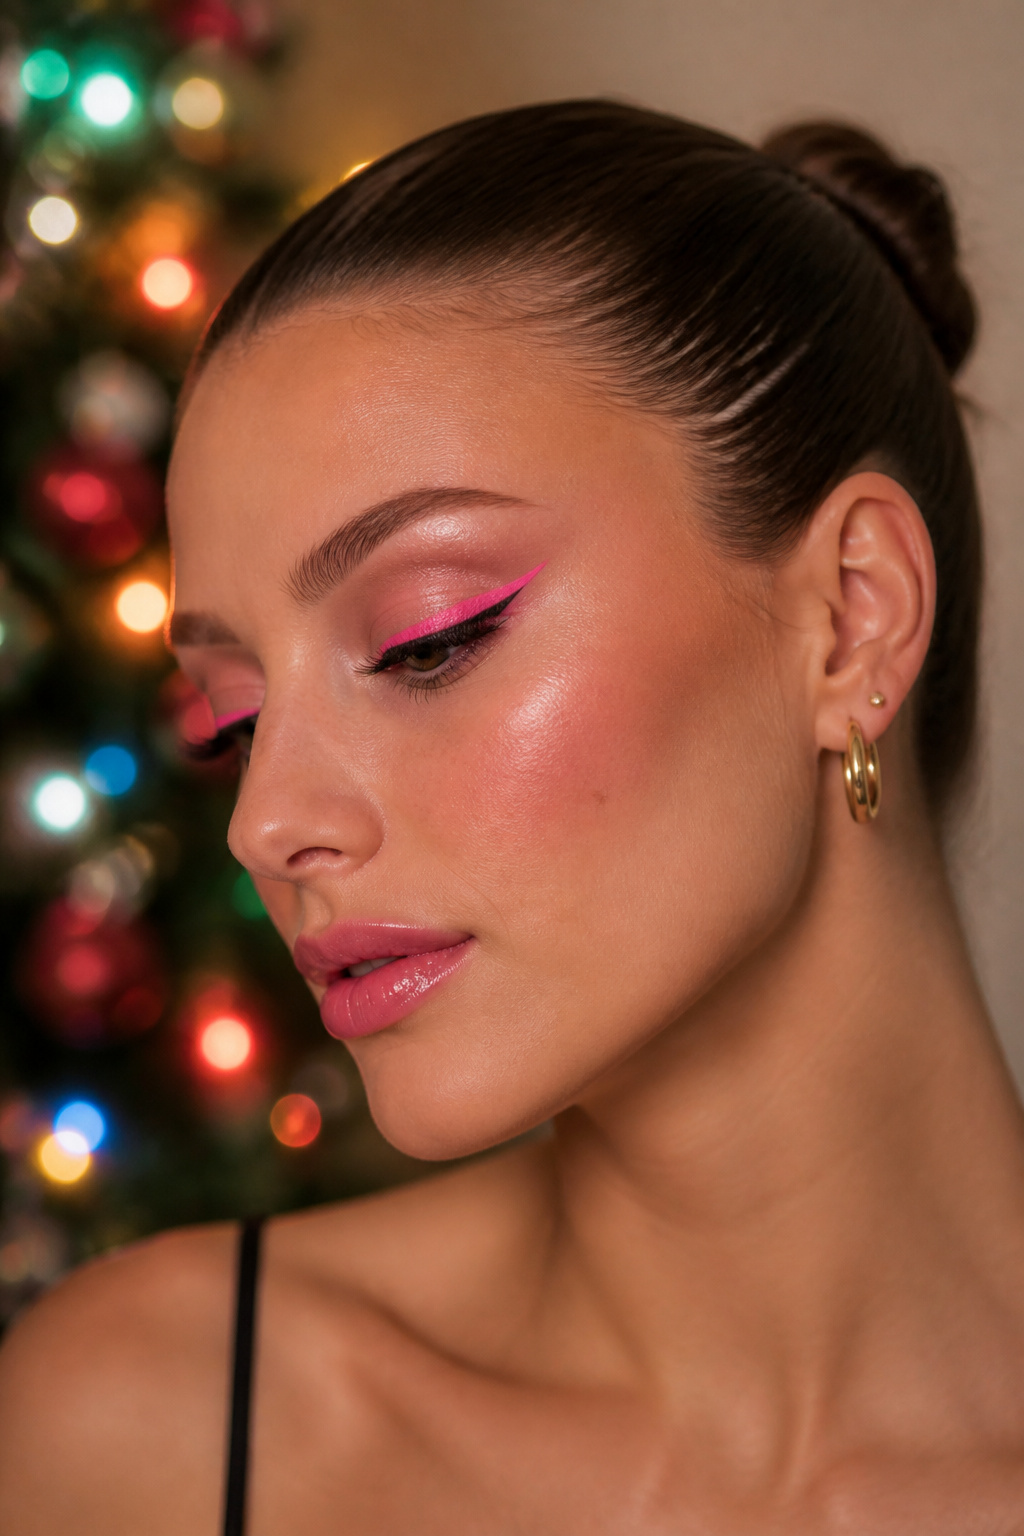
Neon pink reads as a dare at a Christmas party, and that is exactly why it works. The NYX Cosmetics Vivid Brights Liners carry enough pigment to function as either a full lid wash or a sharp graphic wing floating over neutral shadow. For the wash, sweep the liner across the lid with a flat brush and work quickly; the formula sets fast. For the wing, lay down your bone or taupe base first, then draw the shape with the liner’s fine tip and let it dry completely before opening the eye fully.
Setting the liner with a matching powder shadow locks the color in place for the full night. Press the shadow over the liner with a small dense brush; the pigment binds to the cream and stops the creasing that liquid formulas usually surrender to by hour two.
Skip primer and you will watch the neon collapse. The pink oxidizes against bare skin, and within three hours what started as electric ends as a dull rose stain with ragged edges. Prime, lay the liner, set it, then step into the light.
6. Sparkling Brown Eyeshadow
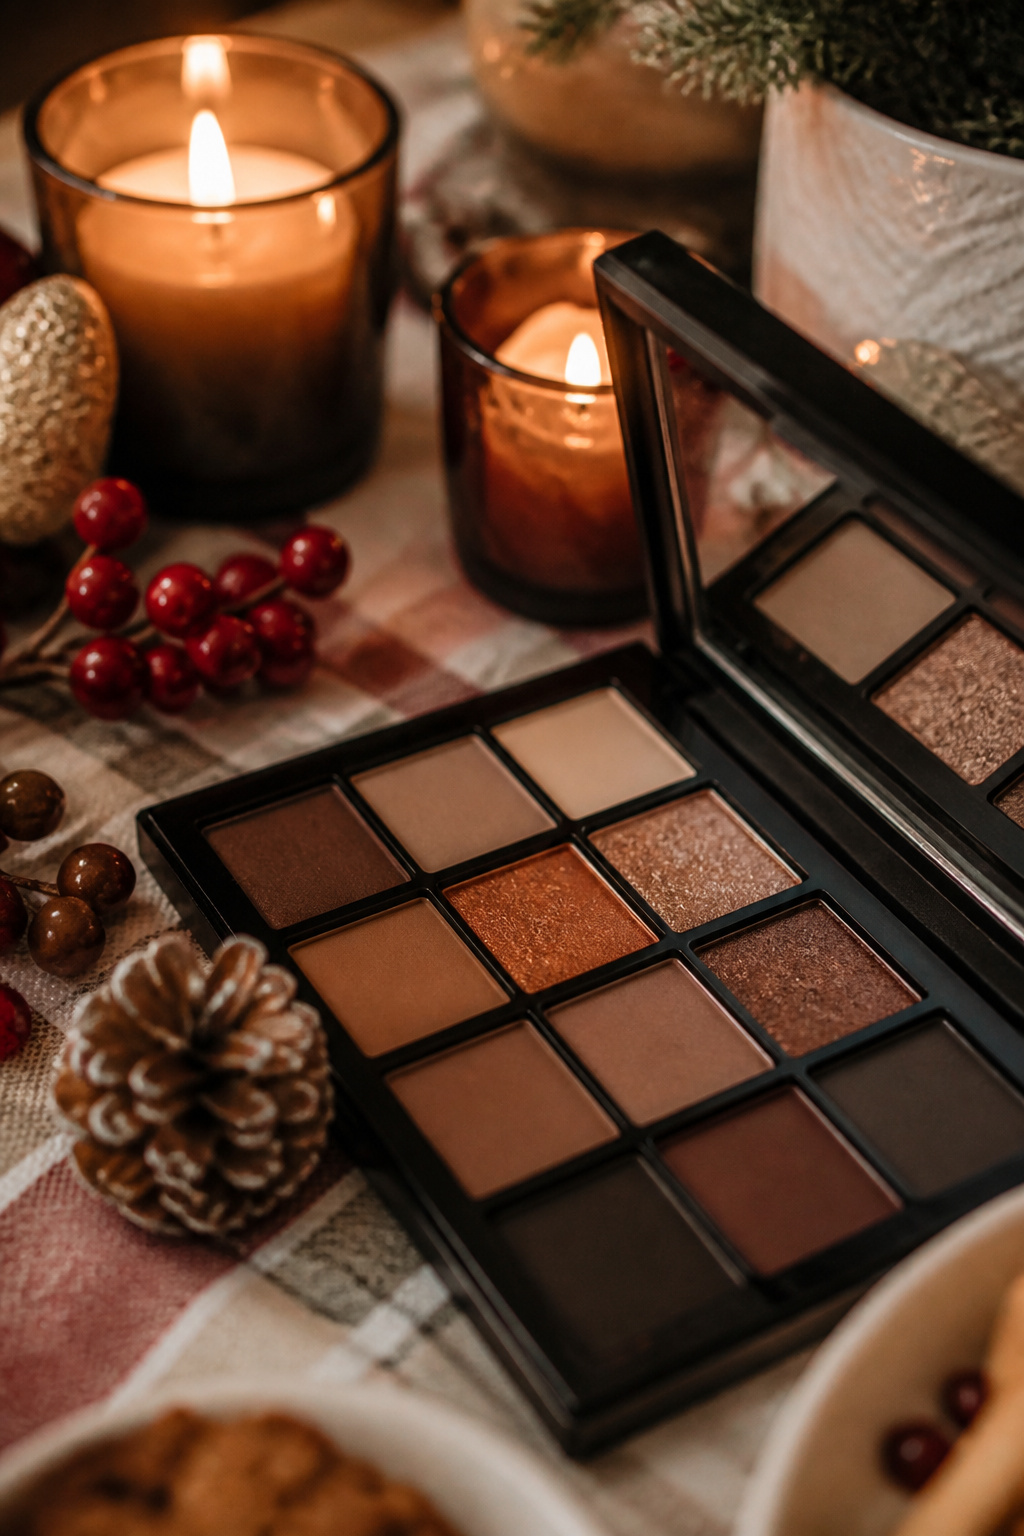
Start with a matte brown two shades deeper than your skin tone and work it through the crease with a soft, windshield-wiper motion. Build until the color holds real depth but still blends at the edges; this gives the eye its shape before anything reflective touches the lid. Press the bronze or copper shimmer onto the center of the lid with a damp brush, not a dry one. The water tightens the pigment so it sits like foil rather than dust, and patting keeps the particles where you place them instead of scattering toward the brow bone.
The holiday read comes from that metallic finish catching light, not from red or green announcing the season. It is a quieter kind of festivity, one that works for a dinner where you want to look dressed up without looking costumed.
The mistake is taking that shimmer across the entire lid and up to the brow. The brown recedes, the light catches everywhere at once, and the whole eye goes flat. You lose the depth you built. Keep the brow bone matte, keep the outer corner in brown, and let the metallic live only where the eye would naturally catch light.
7. Soft Shimmer and Shine Christmas Eyeshadow
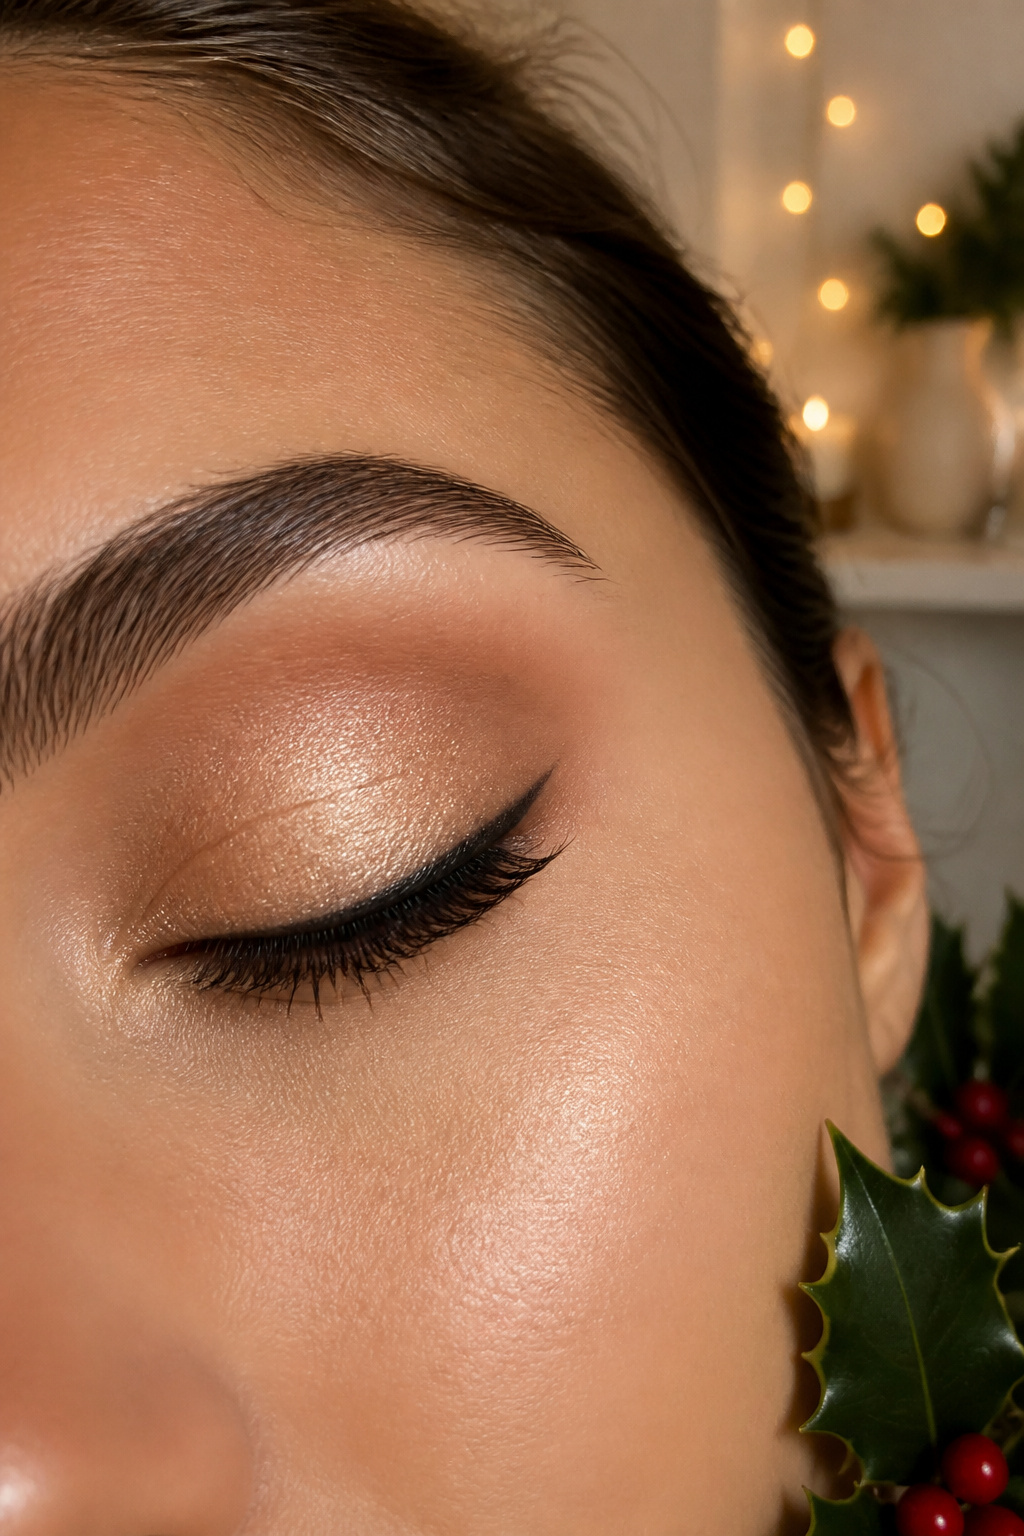
A single champagne or soft gold shimmer across the lid reads festive without announcing itself. Blend it into a matte crease one shade deeper than your skin tone, just enough to add dimension without creating contrast. Apply the shimmer with a fingertip, not a brush. The warmth of your skin melts the pigment into something that looks like actual skin that catches light, not like a product sitting on top of it. Brushes leave a thinner, more scattered deposit that can read glittery rather than luminous. This is where the look lives or dies: choose a shimmer with fine, uniform particles. A formula built on large-particle glitter turns the whole thing juvenile fast. The refinement depends on the particle size being small enough that what registers is glow, not sparkle.
8. Mysterious Nebula Shaded Eyes
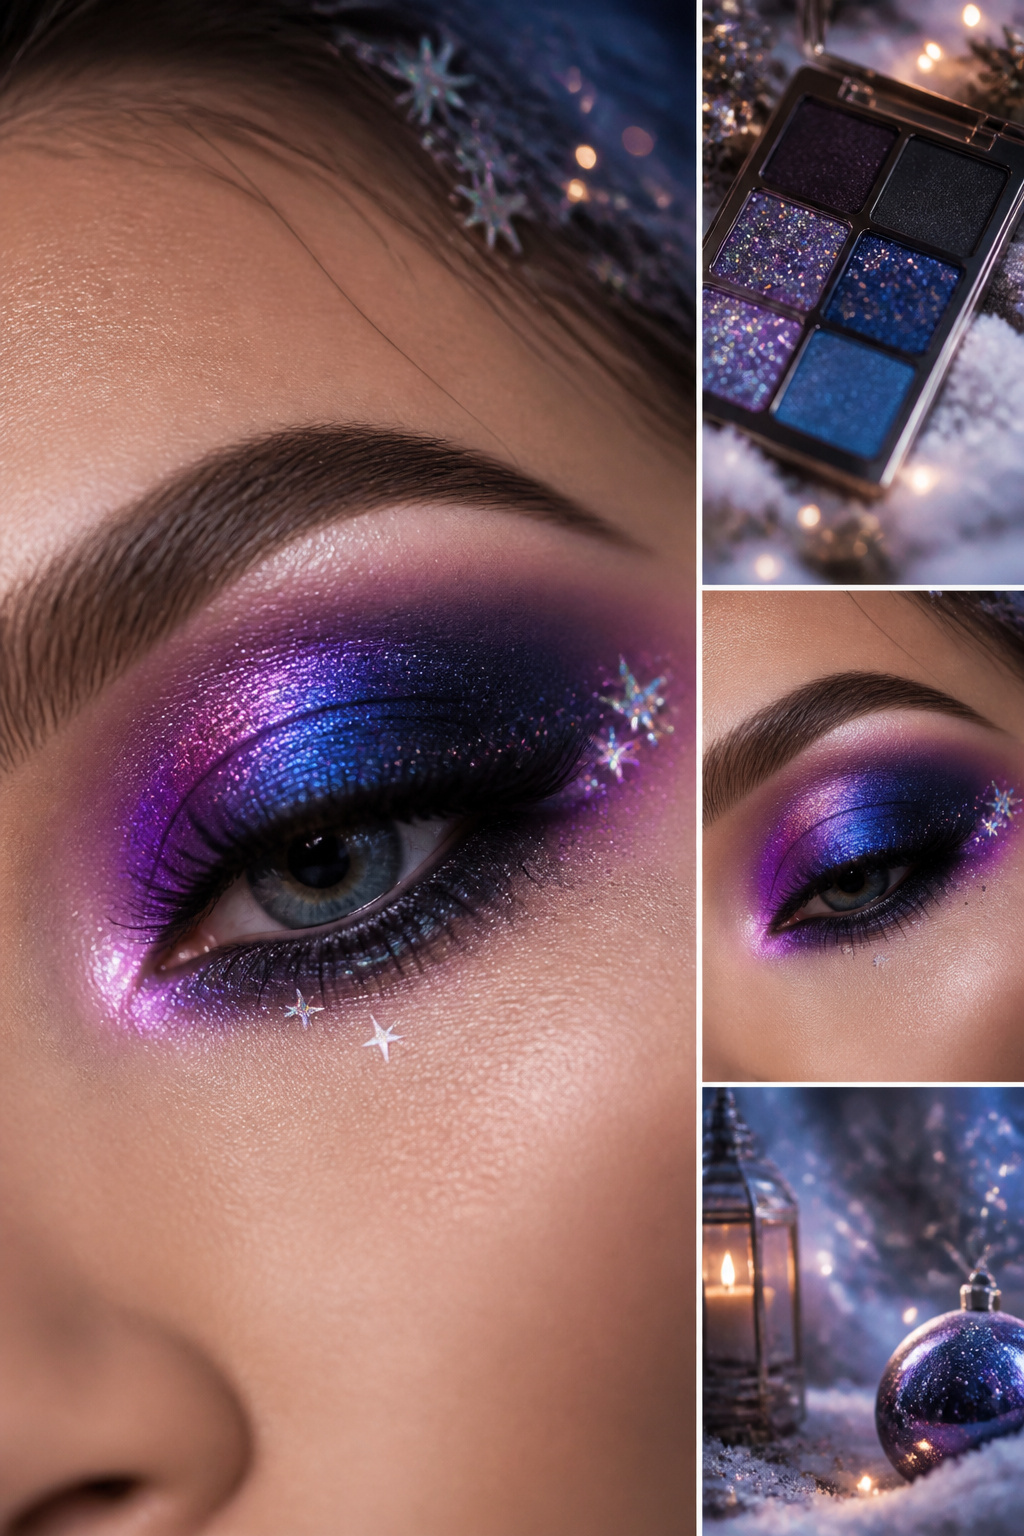
A night-sky eye starts with purple swept across the inner third of the lid, blue packed into the center, and black pressed into the outer corner. Work in that order, light to dark, because the moment black touches wet purple or blue, you are committed to gray mud. Let each layer set slightly before the next goes down.
The blend happens last, with a clean brush and no fresh pigment on it. A small dense blending brush, the kind with short packed bristles that still have some spring, is the right tool for the transition zones. It lets you feather the edge where purple meets blue, or blue meets black, without dragging the dark color backward and dirtying the lighter one.
The common mistake is laying all three shades down at once while they are still loose and creamy, then trying to blend them together. At that stage they are too wet; they mix on the lid instead of beside each other, and you end up with a single muddy tone. The fix is patience between layers, and keeping that blending brush clean.
9. Graphic-Designed Nude Eyeshadow
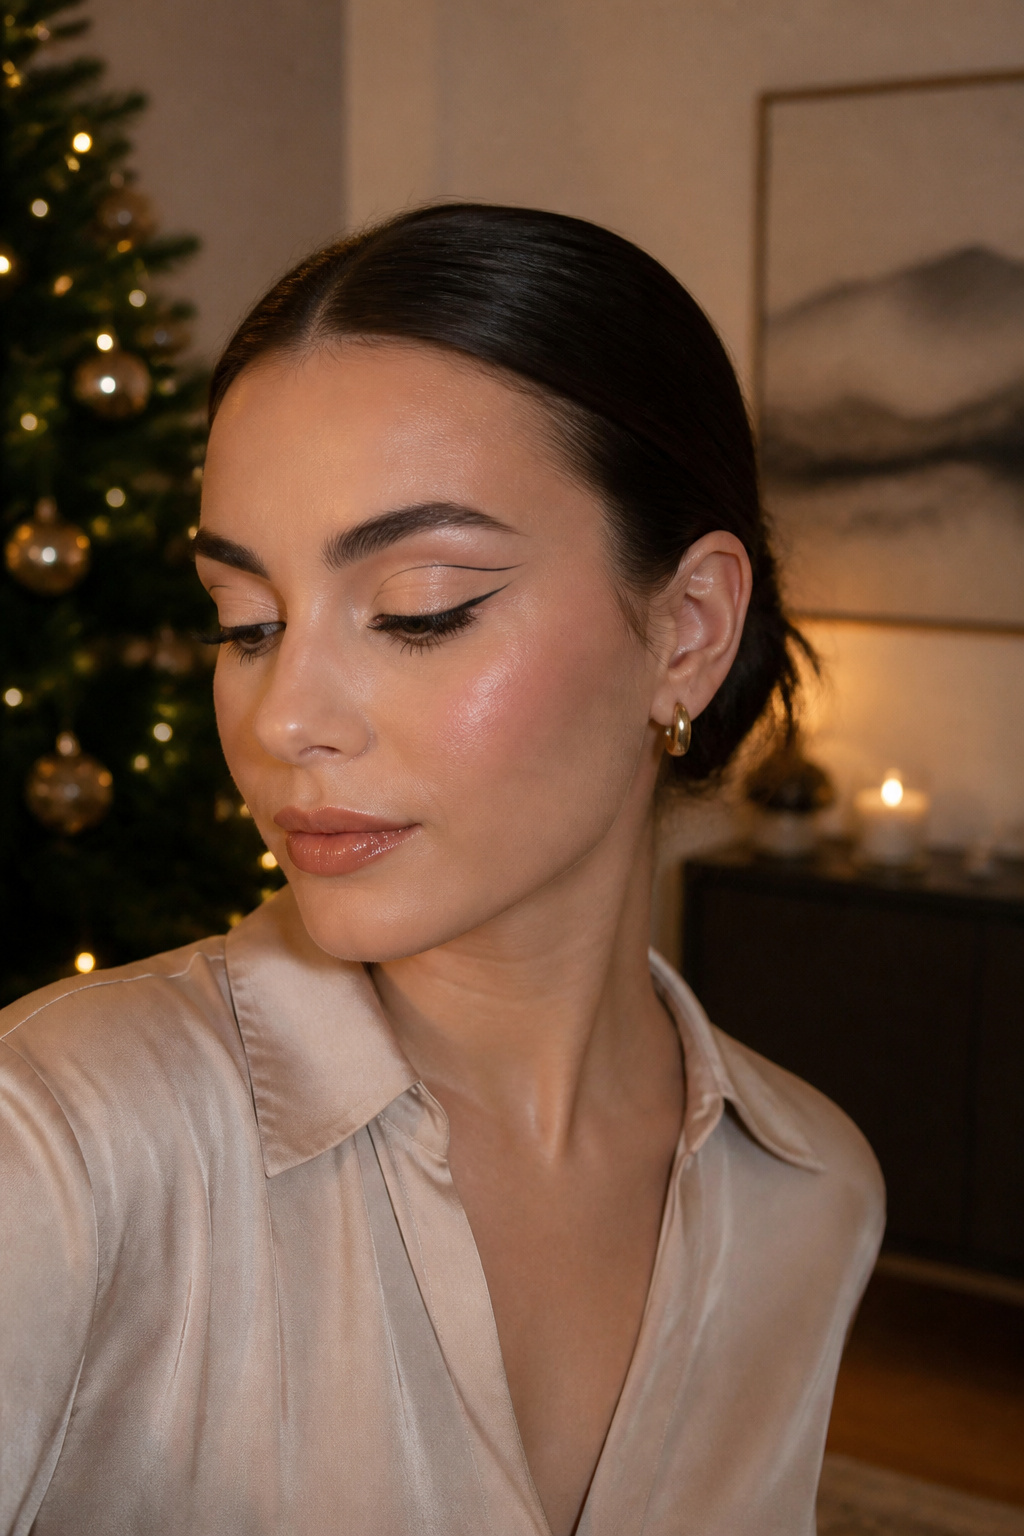
A nude base with a sharp graphic liner element reads as intentional rather than unfinished, which is exactly why it works for a holiday look that still feels dressed up. Start with a matte nude shadow kept blended but controlled, with no color above the natural crease. The restraint matters. Let the shadow sit quietly so the graphic line has room to speak.
Map the shape first with a light eye pencil. Sketch the angle at the outer corner, or trace a floating crease line, or draw a double wing. Whatever shape you choose, this preliminary map lets you adjust before committing. Trace over it with liquid liner. The Revlon ColorStay Liquid Eye Pen gives the precision you need for edges that stay crisp.
The common mistake is running the graphic line too thick. A heavy black or metallic stroke swallows the nude base entirely, and you lose the design element you built the look around. Keep the line weight deliberate and consistent. Thin holds better than you think.
10. Enchanting Dusty Rose Eyeshadow
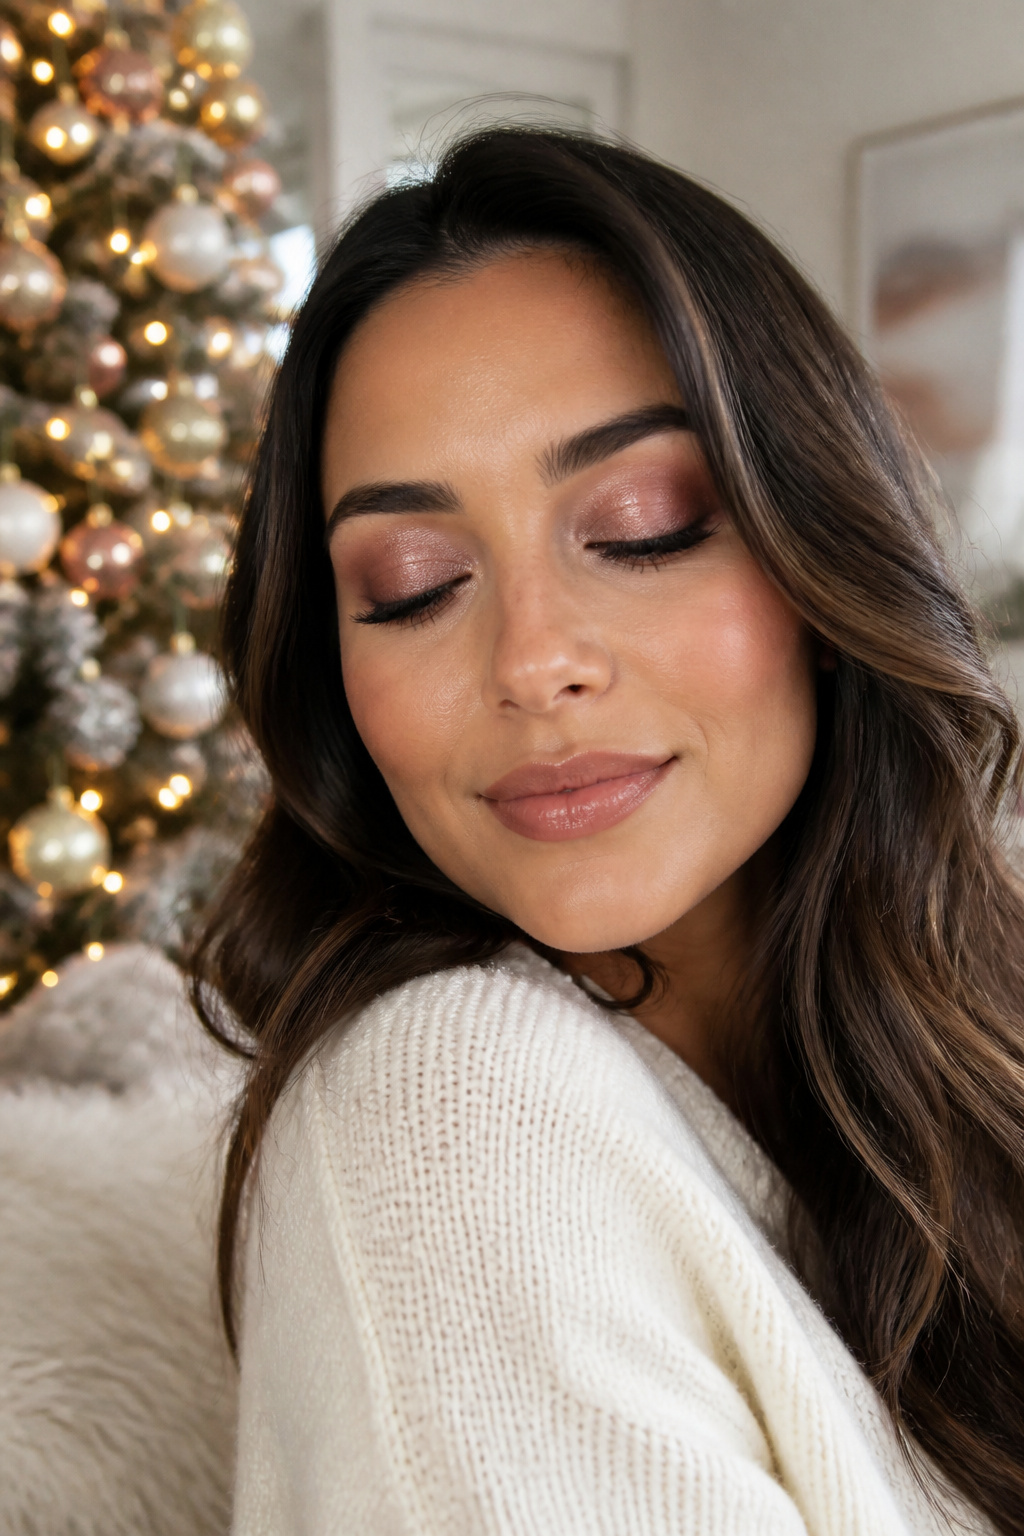
A muted pink-brown eye reads soft against daylight, which makes it practical for the holiday brunch or the office party that ends before dinner. Start with matte dusty rose across the whole lid, blended up to the brow bone but not past it. Then press matte brown into the outer third of the lid and sweep it slightly upward at the corner; this gives the eye shape without reading as evening drama. Tap a fine shimmer, barely there, onto the center of the lid with a pinky finger so it catches light only when you turn your head.
This restraint leaves room for a red lip without the face feeling overdone. The balance works because neither feature shouts.
The mistake is choosing a dusty rose with too much gray in the base. It sinks into the skin and looks bruised, not romantic. Swatch it on the back of your hand in natural light first; the undertone should read warm, like faded tea roses, not cool like slate. If it drifts toward mauve, put it back.
11. Sparkling Rainbow-Hued Eyeshadow
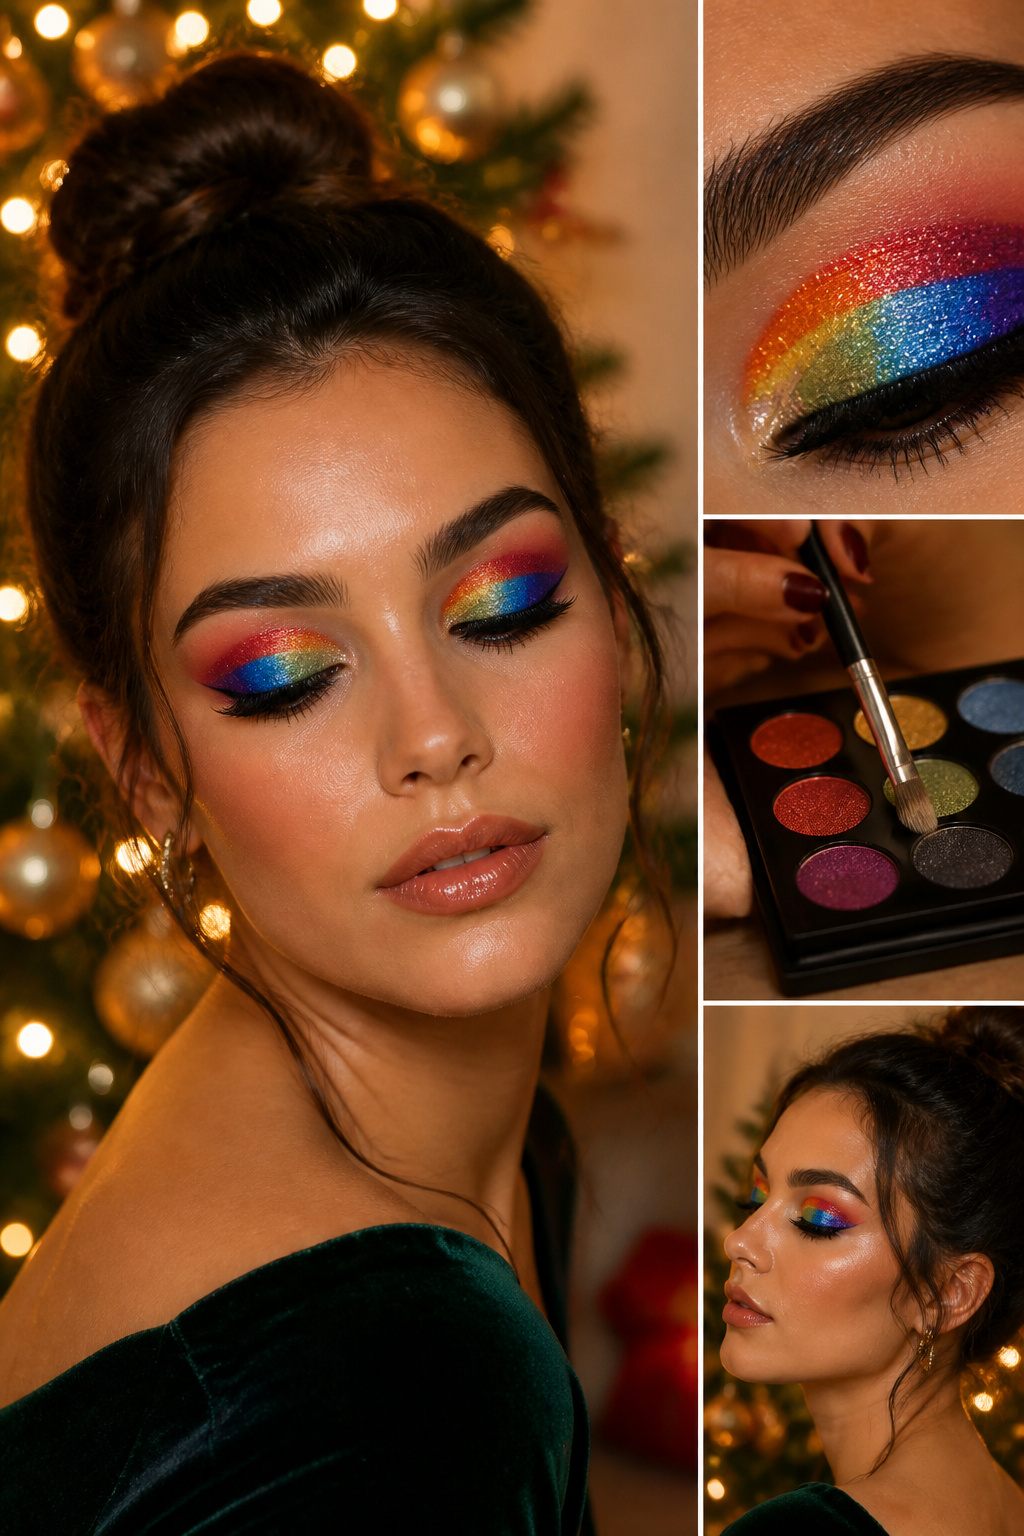
A multi-color eye look lives or dies on how cleanly the bands sit against each other. Start with a small flat brush for each color, laying pigment into its zone and stopping short of where the next shade begins. The Morphe 35b palette has the range you need for this, with enough saturation that you do not have to build forever to get a visible stripe. Once every band is down, take a clean blending brush and soften only the line where two colors meet, not the body of either shade. Work in tiny circles until the edge dissolves; if you drag the brush through the full band, you will muddy the whole thing.
The order matters more than most people expect. Lay light colors first, then dark. Dark pigments are greedy, they grab and shift into whatever sits underneath them. A pale gold that reads bright and clean will turn murky and grey if a burgundy or forest green bleeds across it. If you have already made this mistake, you have seen the result: a lid that looks bruised rather than festive. Fix it by going back in with the original light shade on a clean brush and patting it back to opacity, then re-soften the seam. The extra five minutes of cleanup is faster than starting over, but it is still time you would rather spend on lashes or liner.
12. Sparkly Green Christmas Eyeshadow
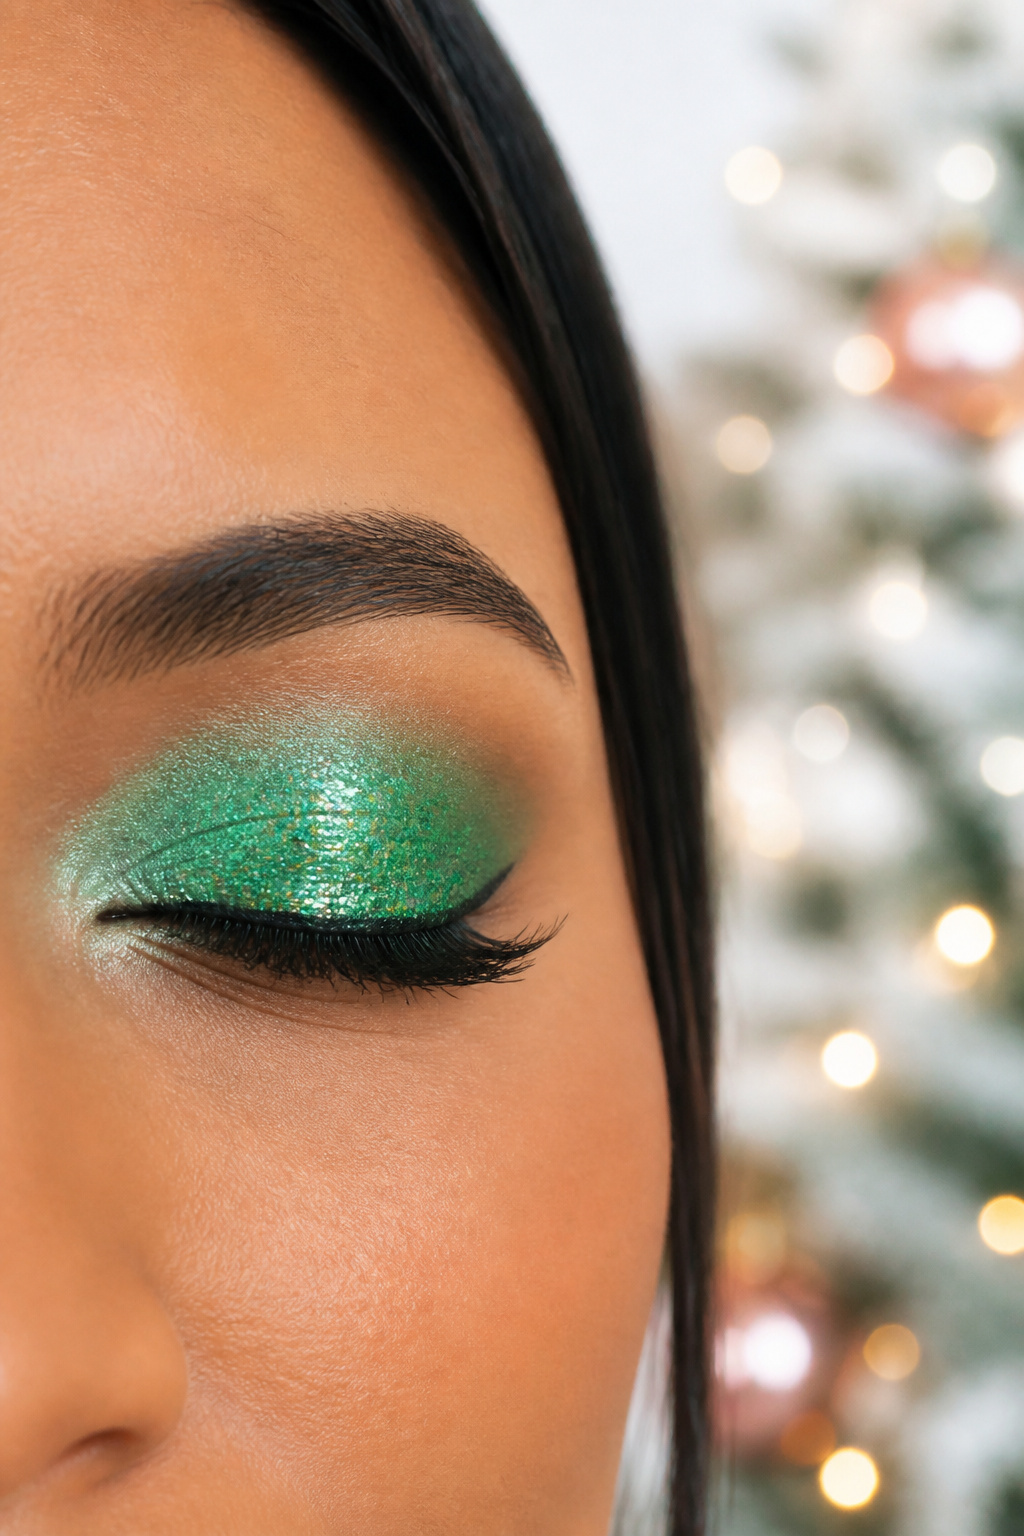
Mint and seafoam sit lighter on the lid than the deep emerald you see in holiday editorials, and that playfulness is exactly the point. You lay down a glitter primer, not a cream base, which gives the loose pigment something to grip without adding weight. Press the glitter on with a fingertip or a flat silicone tool after the green shadow is down; a brush blows the particles across your cheekbone before they ever reach the lash line.
Fallout is the real enemy here. Do your eyes before you put on foundation, concealer, or whatever base you wear. The glitter that escapes wipes away clean with a damp cotton round, and you start your face makeup on skin that has never seen the mess. Skip this order and you spend ten minutes picking sparkle out of your pores with a spoolie, which is not how anyone wants to spend Christmas morning.
13. Santa Hat Christmas Eyeshadow
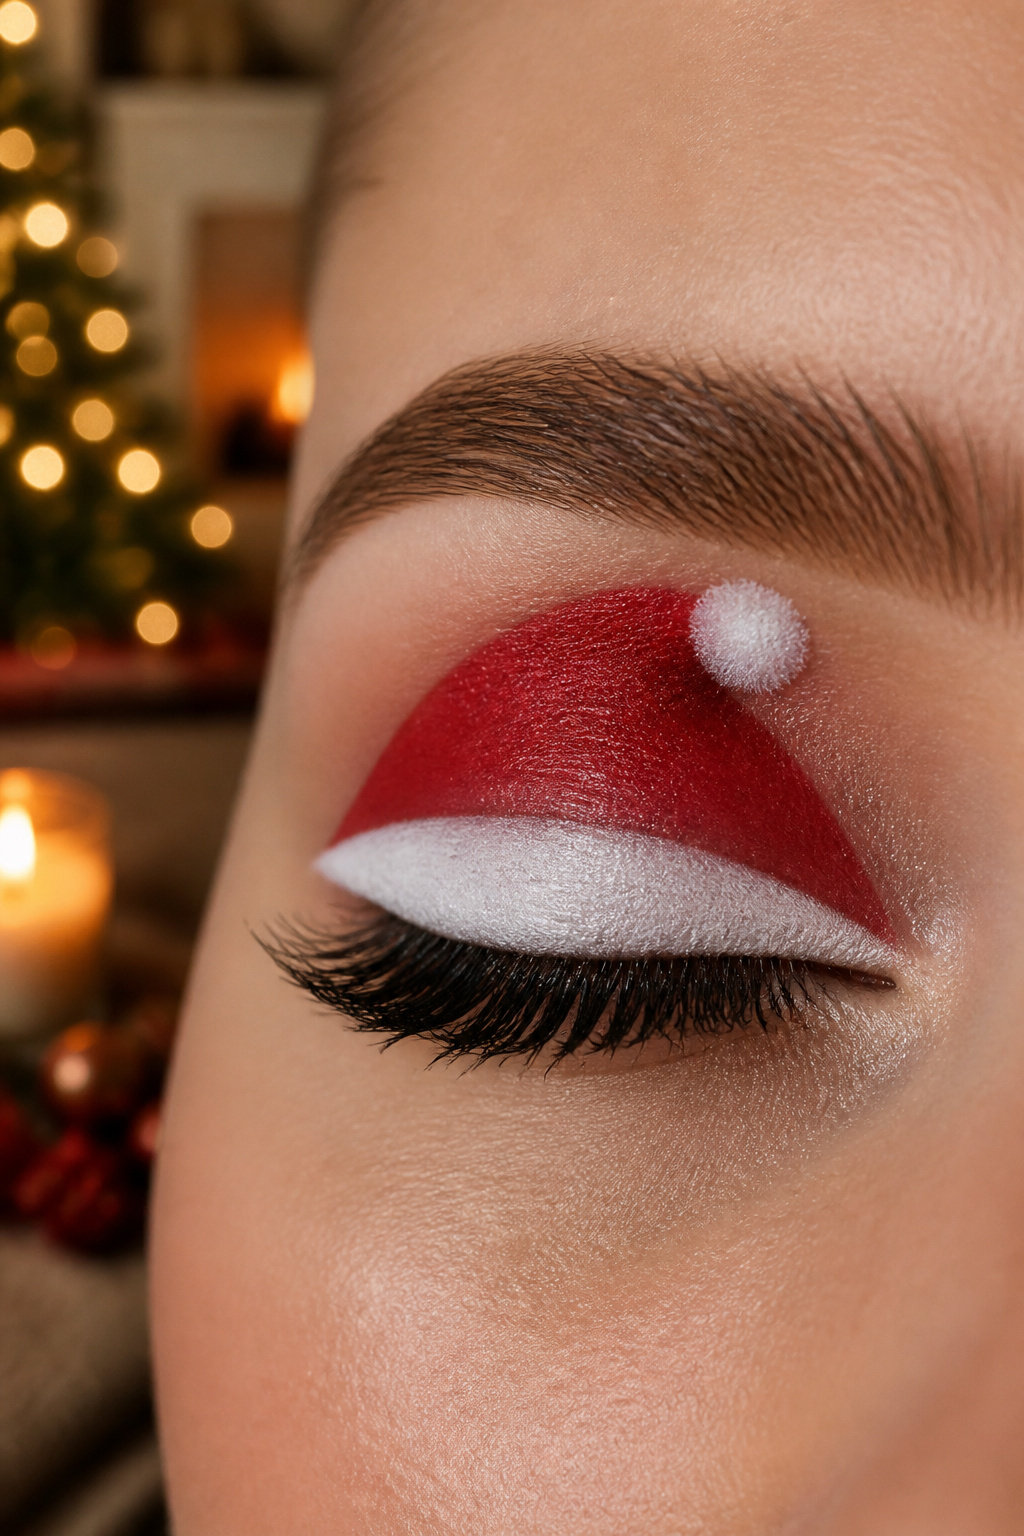
Santa Hat Christmas Eyeshadow starts with a white pencil sketch directly on the lid, mapping where the hat brim sits and how far the crown extends. You want the brim close to the lash line and the pom-pom no higher than the crease; go past that point and the shape collapses into a red blob when you open your eye. Fill the crown with red cream shadow using a small flat brush, then pack white shadow onto the brim and pom-pom with the same brush, cleaned off. A fine detail brush drags black liquid liner around the entire outline; this is what separates a hat from a smear. The mistake most people make is drawing the hat too large for their lid space, so check your work with the eye fully open before committing the liner.
14. Electric Blue Christmas Eyeshadow
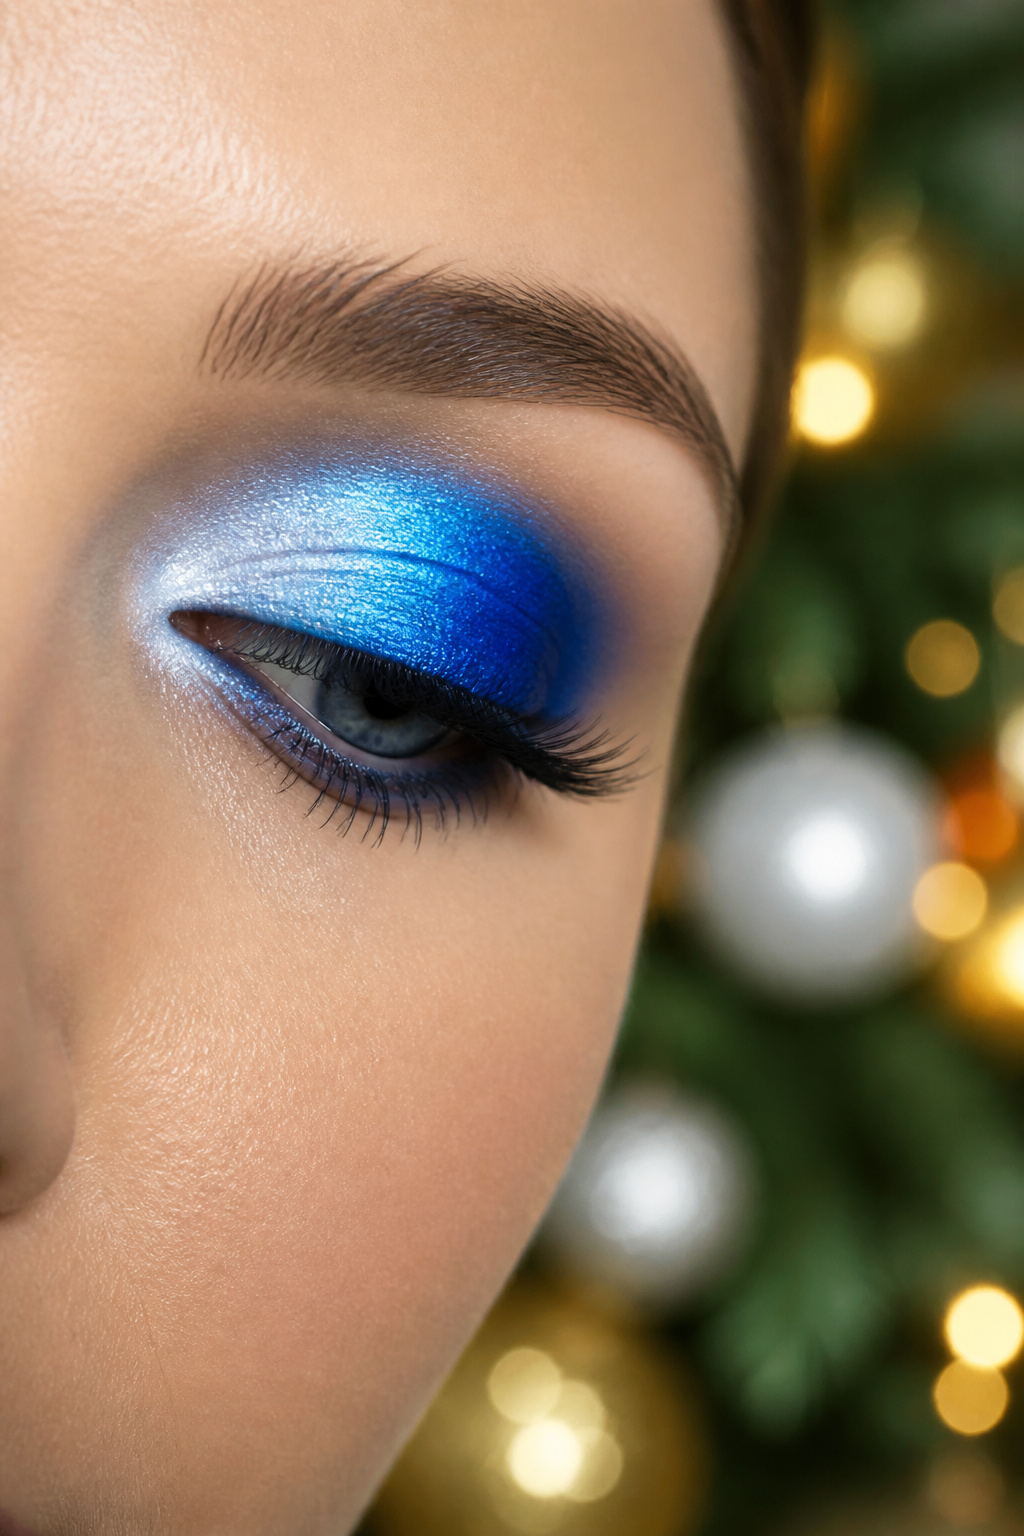
Electric blue sits at a different register than navy. It reads as voltage, not depth, and getting it there takes a white base first. Pat something like a cream stick or a white primer across the lid, then pack the blue on top with a damp brush. The moisture turns the shadow into paste and the color comes up almost neon, which is the whole point.
If powder shadow still reads dull, NYX Cosmetics Vivid Brights Liners hit the same saturation in a single stroke. Draw the shape, let it set, and you have the same jolt with less layering.
The balance is in what you leave alone. Keep the lower lash line clean, maybe a tight line of brown or nothing at all. The eye needs somewhere to rest or the look turns costume.
The mistake is blending the blue too far into the crease. Electric pigments have a narrow range where they stay true; push them past the socket line and they muddy toward bruise-tone gray. Stay on the lid, keep the edge sharp, and the color stays live.
15. String of Lights Christmas Eyeshadow
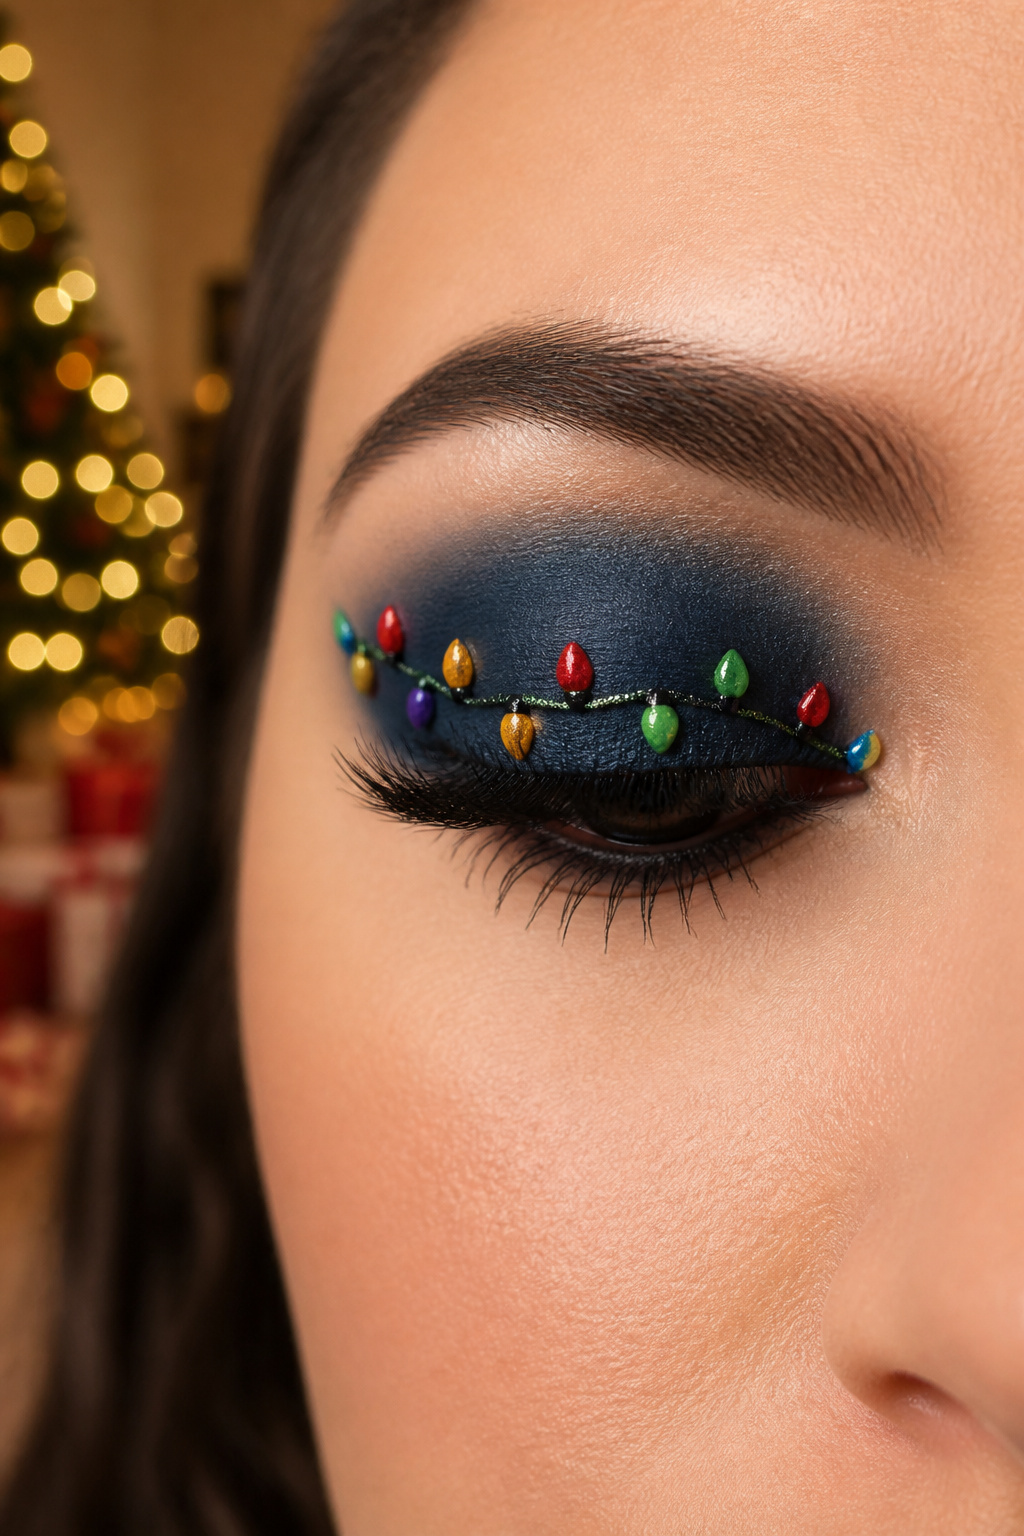
Start with a dark base of black or deep brown shadow across the lid and up through the crease. You want a matte, opaque surface that reads as night sky, not as smoky eye, so keep the edges tight and the intensity uniform.
Place the bulbs with the rounded end of a brush handle or a small dotting tool. Dip into red, green, gold, and blue cream shadows and stamp tiny circles in a line along the lash line or following the crease arc. The dots should sit under two millimeters across; anything larger loses the light-bulb suggestion and becomes random confetti. Space them evenly, like actual bulbs on a wire, with a finger’s width between each color repeat.
For the filament glow, add a pinprick of white cream shadow dead center in each colored dot. This is the detail that sells the illusion, but it only works if the base dots are small enough that the white reads as highlight rather than as a second, competing layer.
The failure mode is spacing. Uneven gaps break the string illusion immediately. If you place two dots too close, the eye reads it as a smudge; too far apart, and you have isolated color spots floating on a dark lid. Work with the eye open, looking straight into the mirror, so you see the arc as an observer would. Fix placement while the cream is still wet; once it sets, the edge will crumble if you try to shift it.
16. Red and Green Christmas Eyeshadow
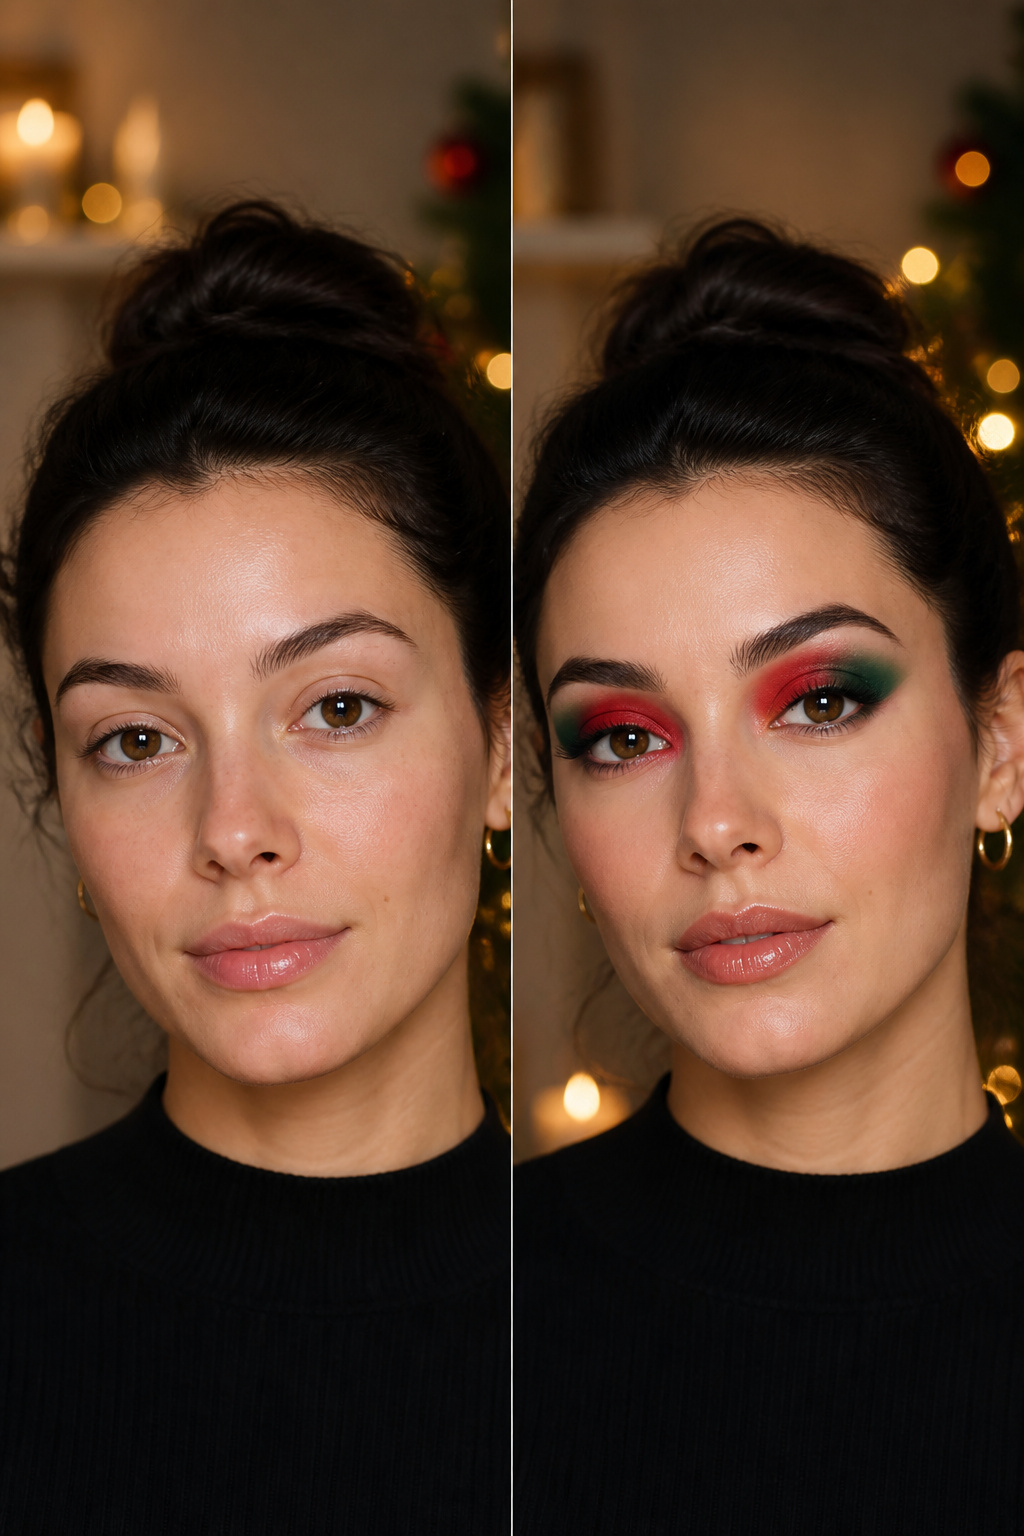
Red and green together on the same lid is the quickest way to look like you raided a costume bin, but the right structure keeps it wearable. Make one color dominant and the other an accent; equal amounts fight each other and read as straight holiday kitsch. A useful split is red across the inner half of the lid, green on the outer half, and a deep brown worked through the crease to bridge them.
The brown is structural, not decorative. It gives the eye a place to rest and prevents the two tones from vibrating against each other. Apply the red and green separately with their own brushes, then blend only the edges where each meets the brown. A clean brush for each color stops them from mixing into mud on the lid, which is what happens when you go back and forth with the same tool. The green should stay sharper on the outer corner if it is the accent, or let the red fade earlier into the crease if you have reversed the balance. Either way, one color does the work and the other nods to it.
17. Silver Bells Smoky Christmas Eyeshadow
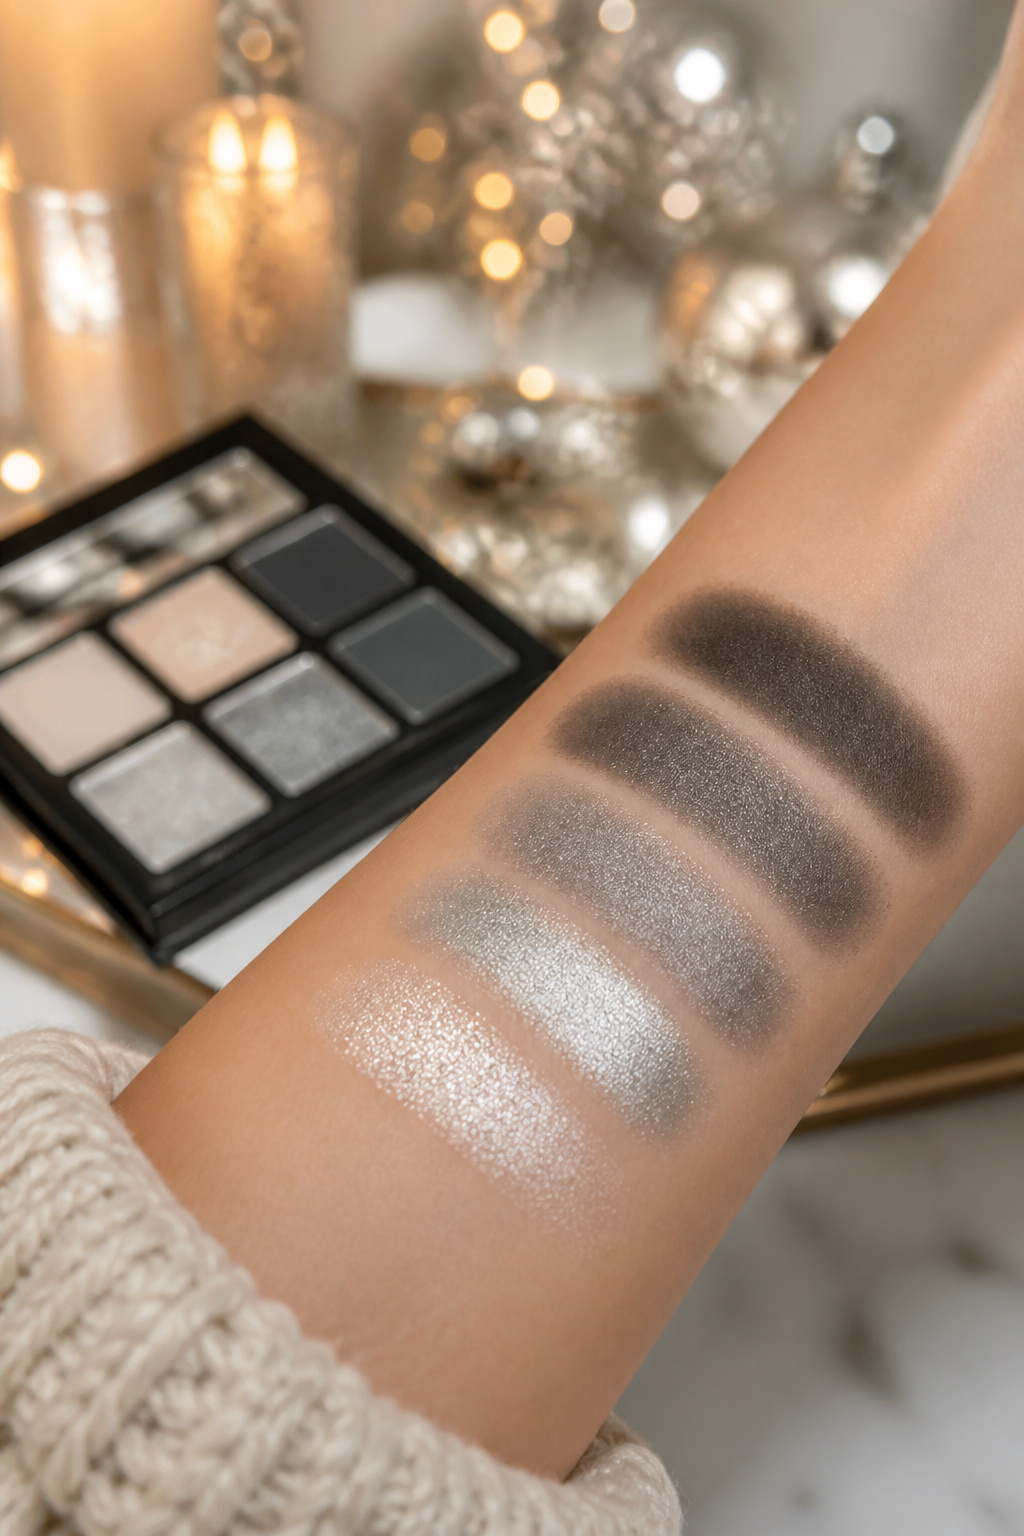
A gray cream base gives the silver somewhere to hold onto, so start there and blend it out past the crease before it sets. The Morphe 35c palette carries the cool-toned silvers and grays you need; pat the lightest silver shimmer onto the center of the lid with a finger, not a brush, so the metallic finish stays dense and bell-like. Build the outer corner and lash line with dark charcoal, not black. Black overwhelms the silver and kills the brightness that makes this read festive rather than goth. The charcoal keeps the depth without swallowing the light.
Warmth keeps the look from going cold. Add a touch of warm champagne to the inner corner, right where the tear duct catches light, and blend the edge where it meets the silver so there is no stripe. The contrast between the cool lid and that small warm point is what makes the eye look alive in holiday photos.
18. Christmas Sweater Eyeshadow
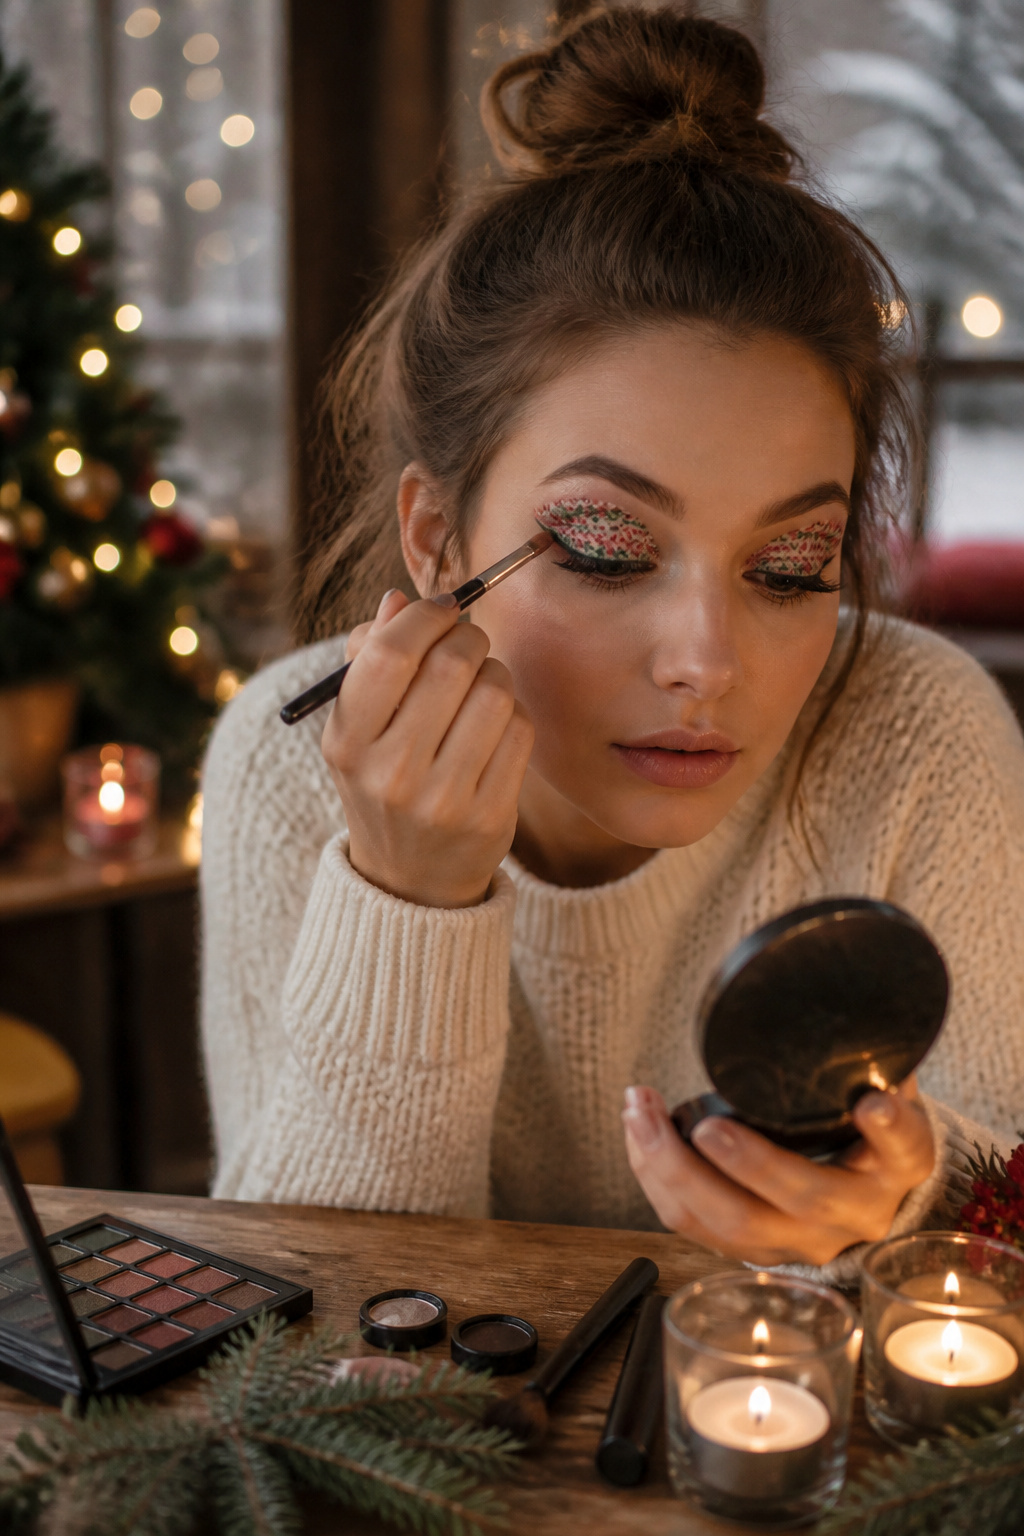
A patterned lid that reads as a Christmas sweater starts with a flat, opaque base in one of the heavier sweater colors: brick red, forest green, or deep navy. You lay that down first, let it set, and only then pick up a fine detail brush for the pattern work. Small repeating shapes, simple diamonds, stripes, or snowflake motifs, are the only things that read at this scale; a fair-isle reindeer scene that looks charming on wool turns into mud on an eyelid. Work one small section at a time, letting each touch dry before you move the brush across it, because a wet edge dragged through a half-finished stripe costs you the whole shape. The patience is real. A full patterned lid can take twenty minutes of careful placement, and rushing it smears the geometry into holiday chaos.
19. Glam Christmas Eyeshadow
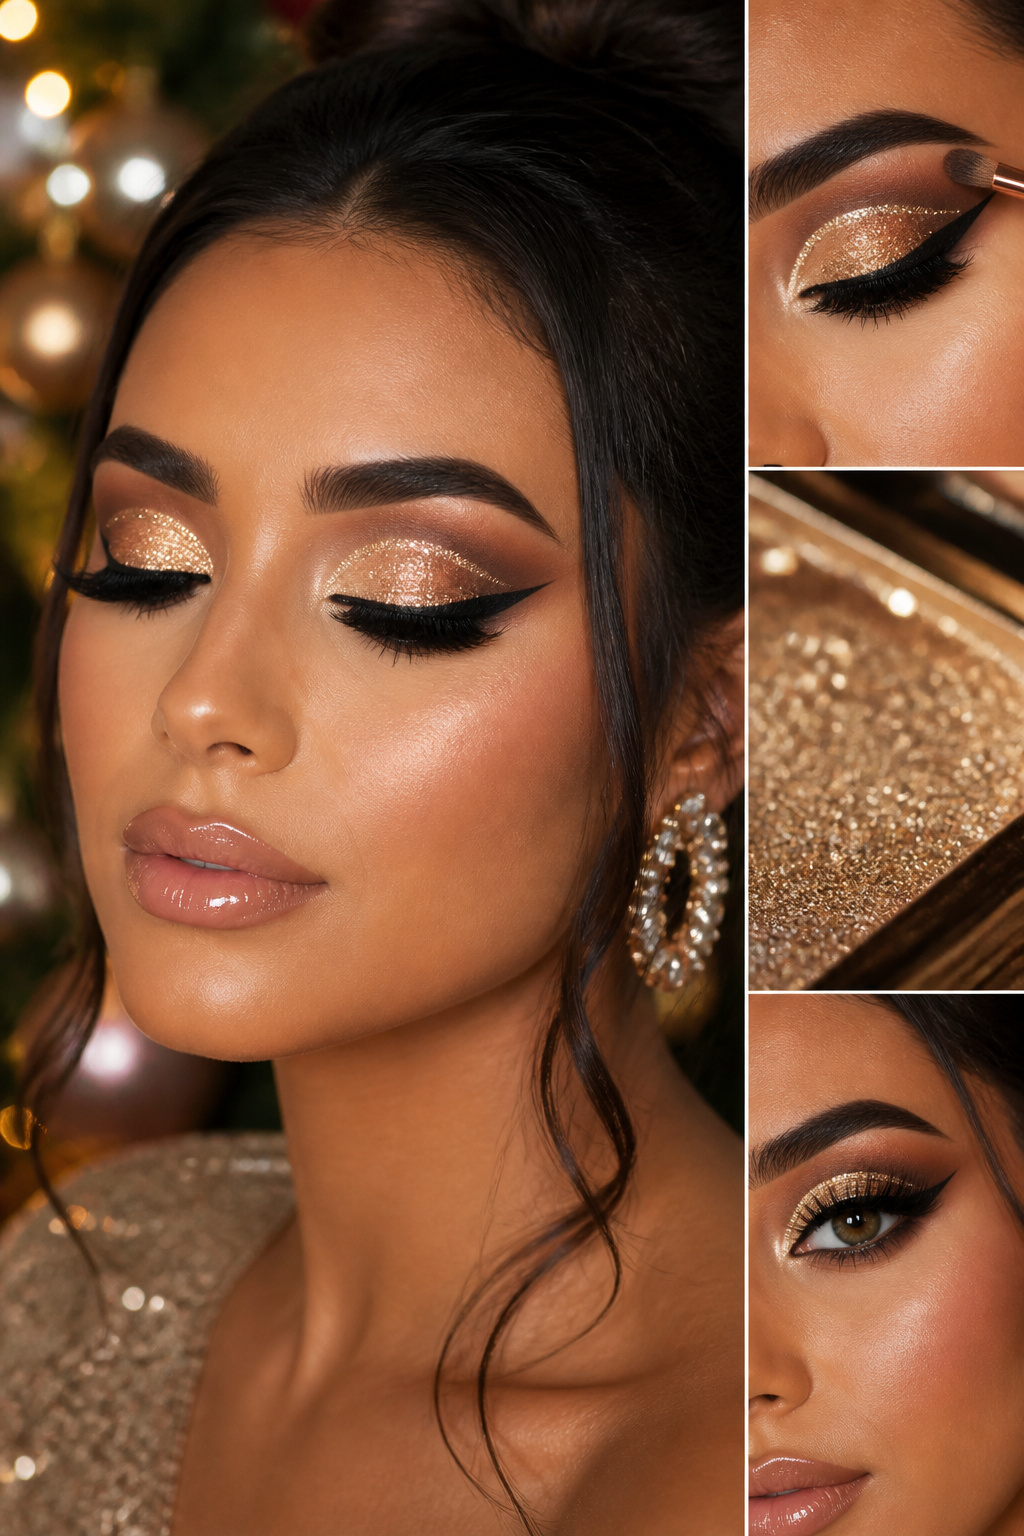
A sharp cut crease is the backbone of this whole thing, and you build it with concealer, not shadow. Draw the line above your natural crease, blend the edge upward, and let it set fully before you move on. That dry, tacky surface is what grabs the glitter you pack on below it, and glitter without a wet base falls straight onto your cheek by midnight.
For the crease definition above the cut line, the matte shades in the De’Lanci Eyeshadow Palettes do the heavy lifting. The pigment is dense enough that two layers gives you a clean, opaque edge without the color turning muddy where it meets the concealer.
Stacked lashes finish the eye, but this is where most people lose the plot. You cannot run a glitter cut crease and double-stacked falsies at full drama together. The lid becomes a traffic jam: sparkle, graphic line, heavy fringe, all screaming for attention. Pick one hero. A glitter cut crease with single, natural-density lashes reads expensive. Dramatic stacked lashes with a satin or metallic lid, no cut crease at all, reads expensive too. Both together just reads like you could not stop.
20. Snowflake Christmas Eyeshadow
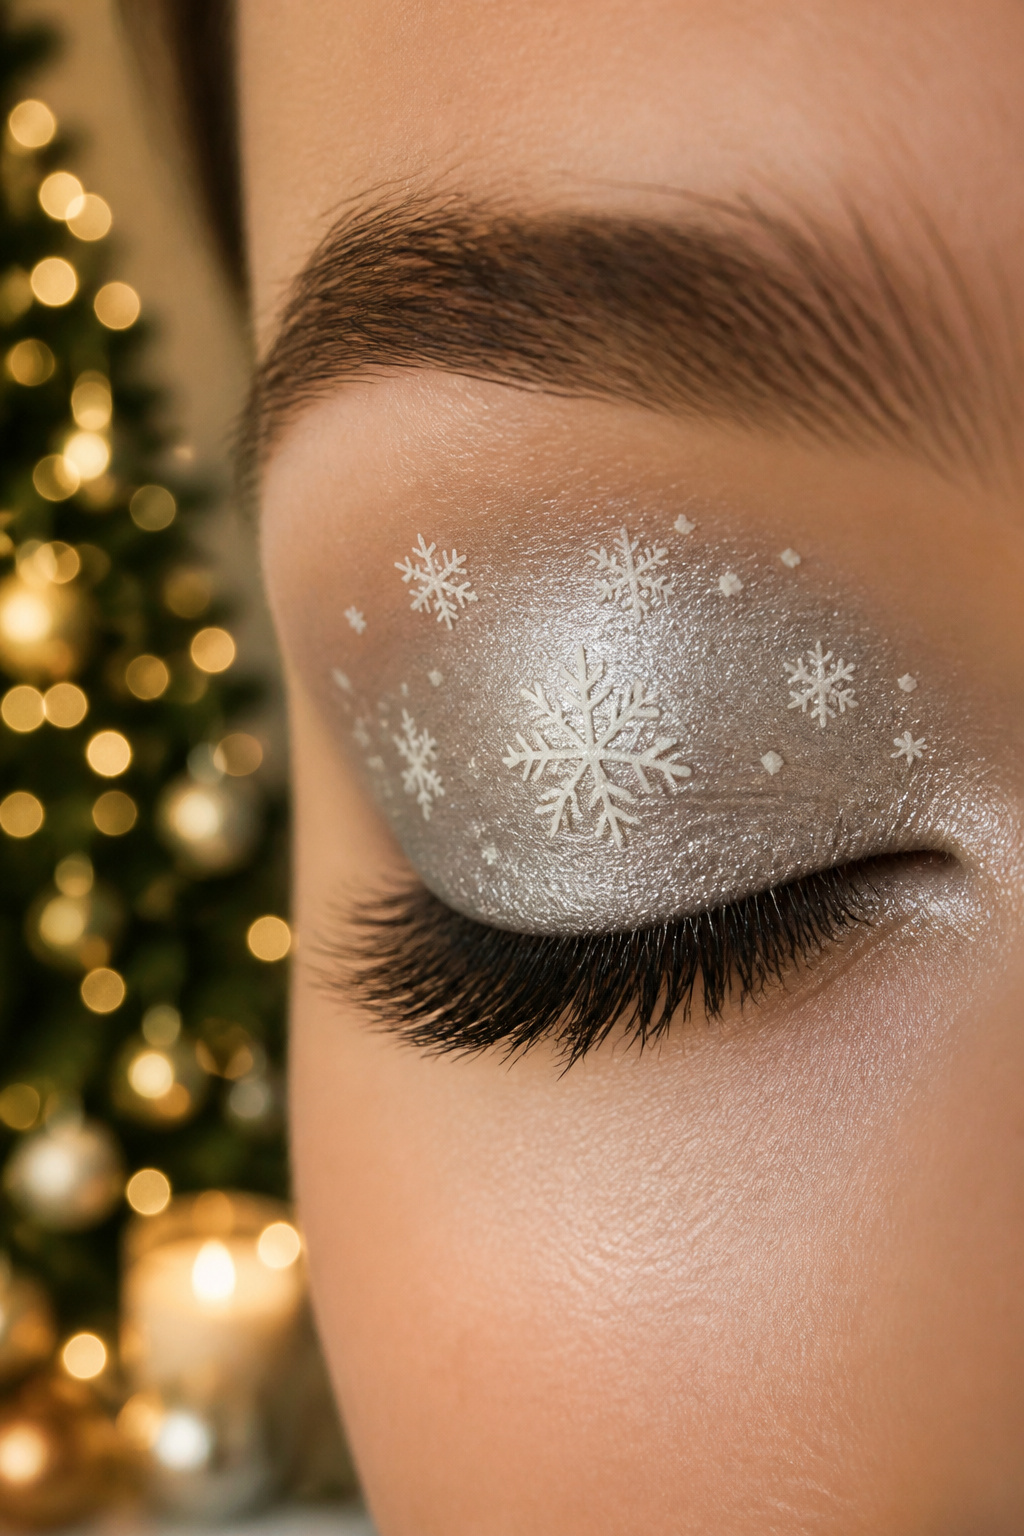
Start with a wash of white or silver cream shadow across the lid and up to the brow bone; it needs to be smooth, because every ridge will fight the detail work coming next. Pick up a fine liner brush and load it with white liquid liner or, for opacity that stays put through a long evening, acrylic paint thinned to ink consistency. Paint small six-pointed snowflakes at the outer corner or drifting along the brow bone, never both. Cluster them on one eye only; matching them across both eyes looks labored and the two sides never actually mirror, so the unevenness reads as a mistake rather than art. Keep the flakes tiny, under a quarter-inch, because large ones warp with every blink and turn into blobs by dessert. Tap a dot of silver glitter into the center of each flake with a toothpick or the flat of a pin; it catches light the way real ice does. The common error is scaling up to "make them show up" from across the room, but eye makeup is viewed at eighteen inches, and restraint at that distance carries.
21. Candy Cane Christmas Eyeshadow
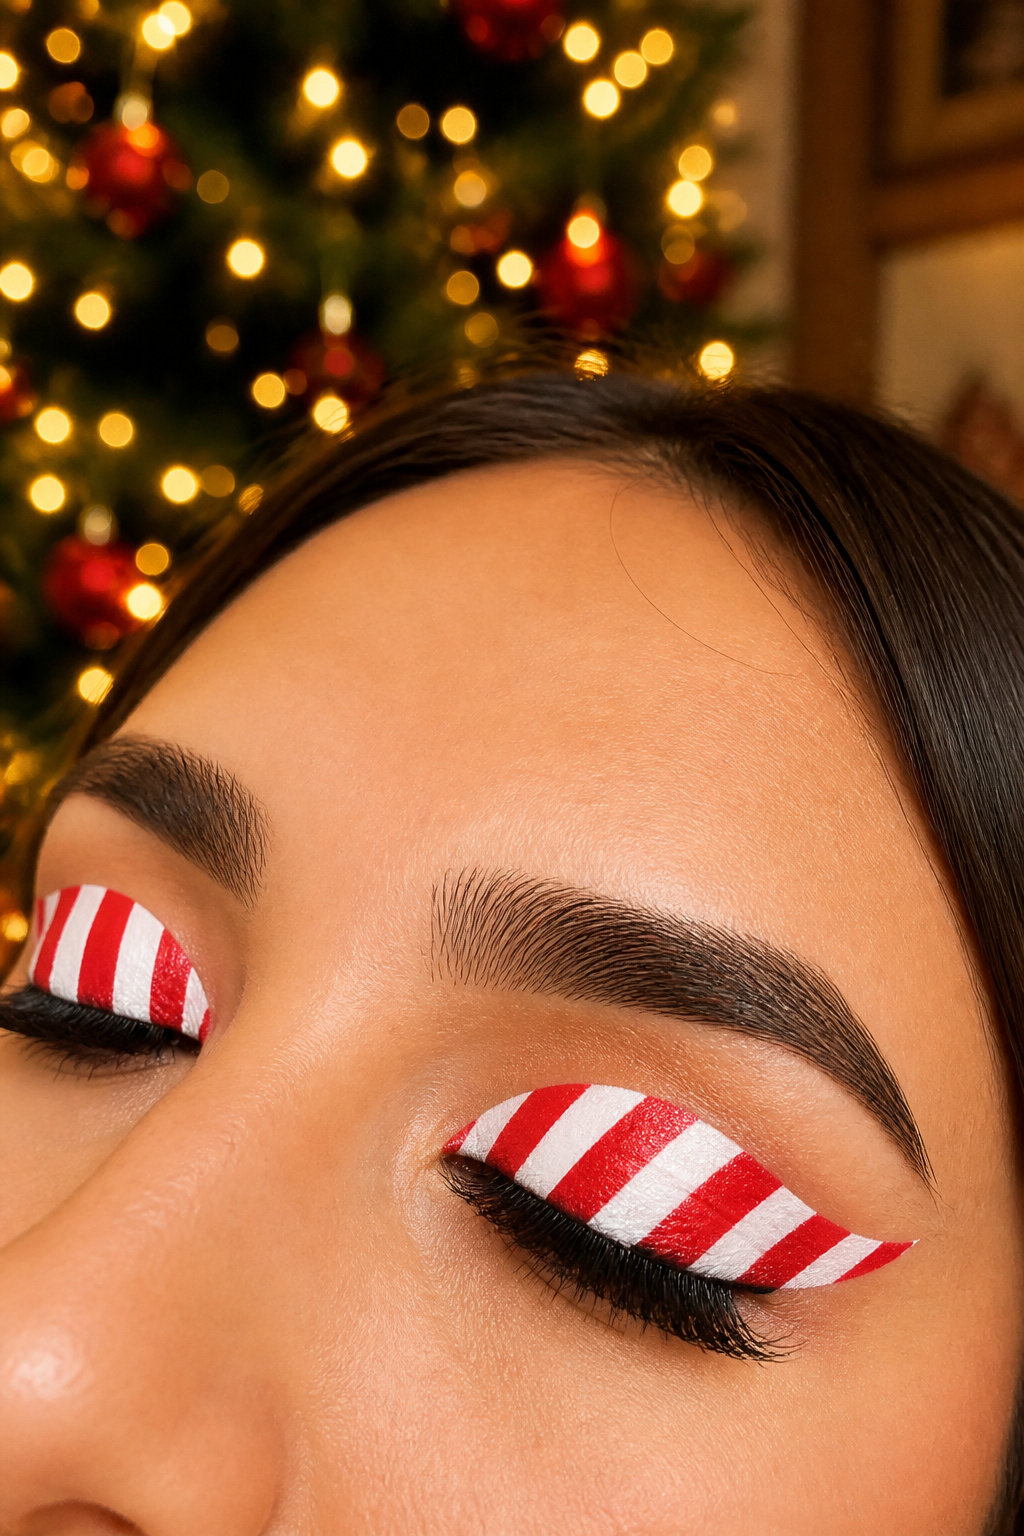
A true candy cane stripe lives or dies on whether the edges read as deliberate. Start with a flat white base across the whole lid, pressed on with a finger so the surface is even and slightly tacky. Cut strips of medical tape or thin stencil plastic, lay them across the lid at the angle you want, and press the edges down hard. Brush red cream shadow into the gaps, let it set for thirty seconds, then peel the tape away slowly. Diagonal stripes lift the eye and read as a design choice; horizontal stripes sit flat and can look like a sports uniform. The common error is freehanding the lines with a brush, which nearly always leaves them slightly wavy. Wavy stripes look accidental, not graphic. If one edge lifts while you work, stop and re-tape rather than trying to correct the bleed.
22. Lazy Christmas Eyeshadow
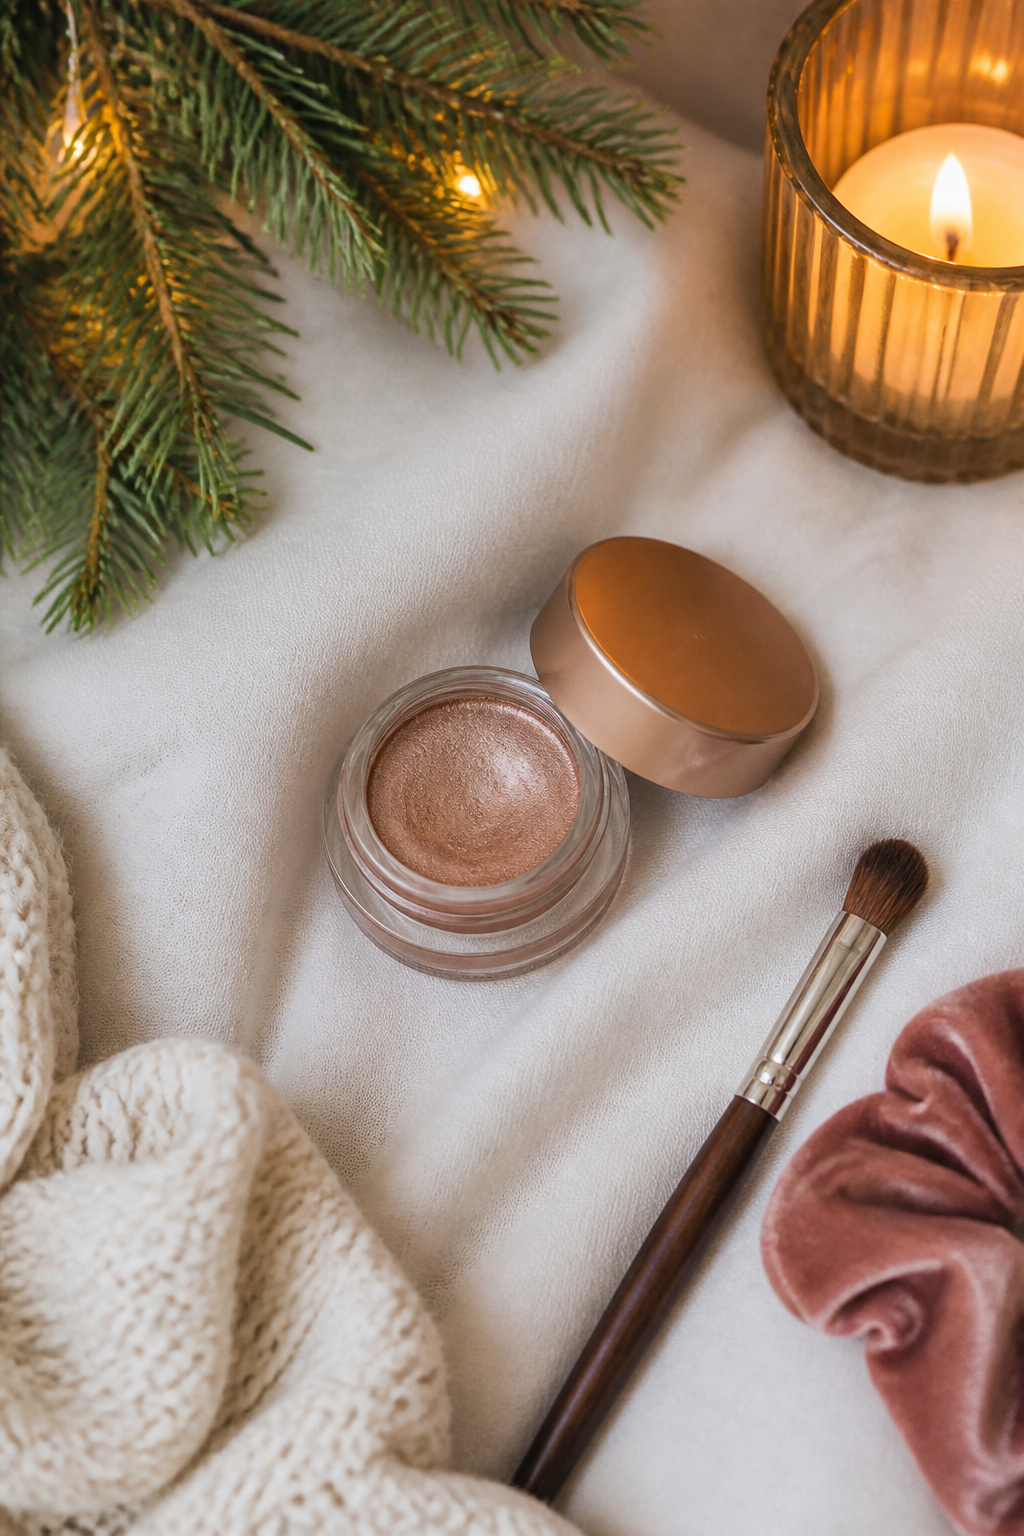
A single shimmery cream shadow stick, swiped from lash line to crease and softened at the edges with a finger, gives you a polished lid in under a minute. Mascara finishes it. This is the one-and-done technique that rescues you when the morning has gone sideways or your hand is not steady enough for fourteen-step blending.
Cream shadow sticks and liquid shadows with built-in applicators are the formats that make this possible. They glide over bare skin without dragging, and the shimmer catches low winter light at a dinner table or an office party. You do not need primer, you do not need brushes, and you do not need patience.
The honest limit is wear time. Without a base to grip, cream formulas collect in the fold of the lid after four or five hours. A twelve-hour marathon of parties will leave you creased and faded by midnight. Plan this for shorter gatherings, or slip the stick in a pocket for a thirty-second touch-up in the restroom between courses.
23. Santa Claus Hat Christmas Eyeshadow
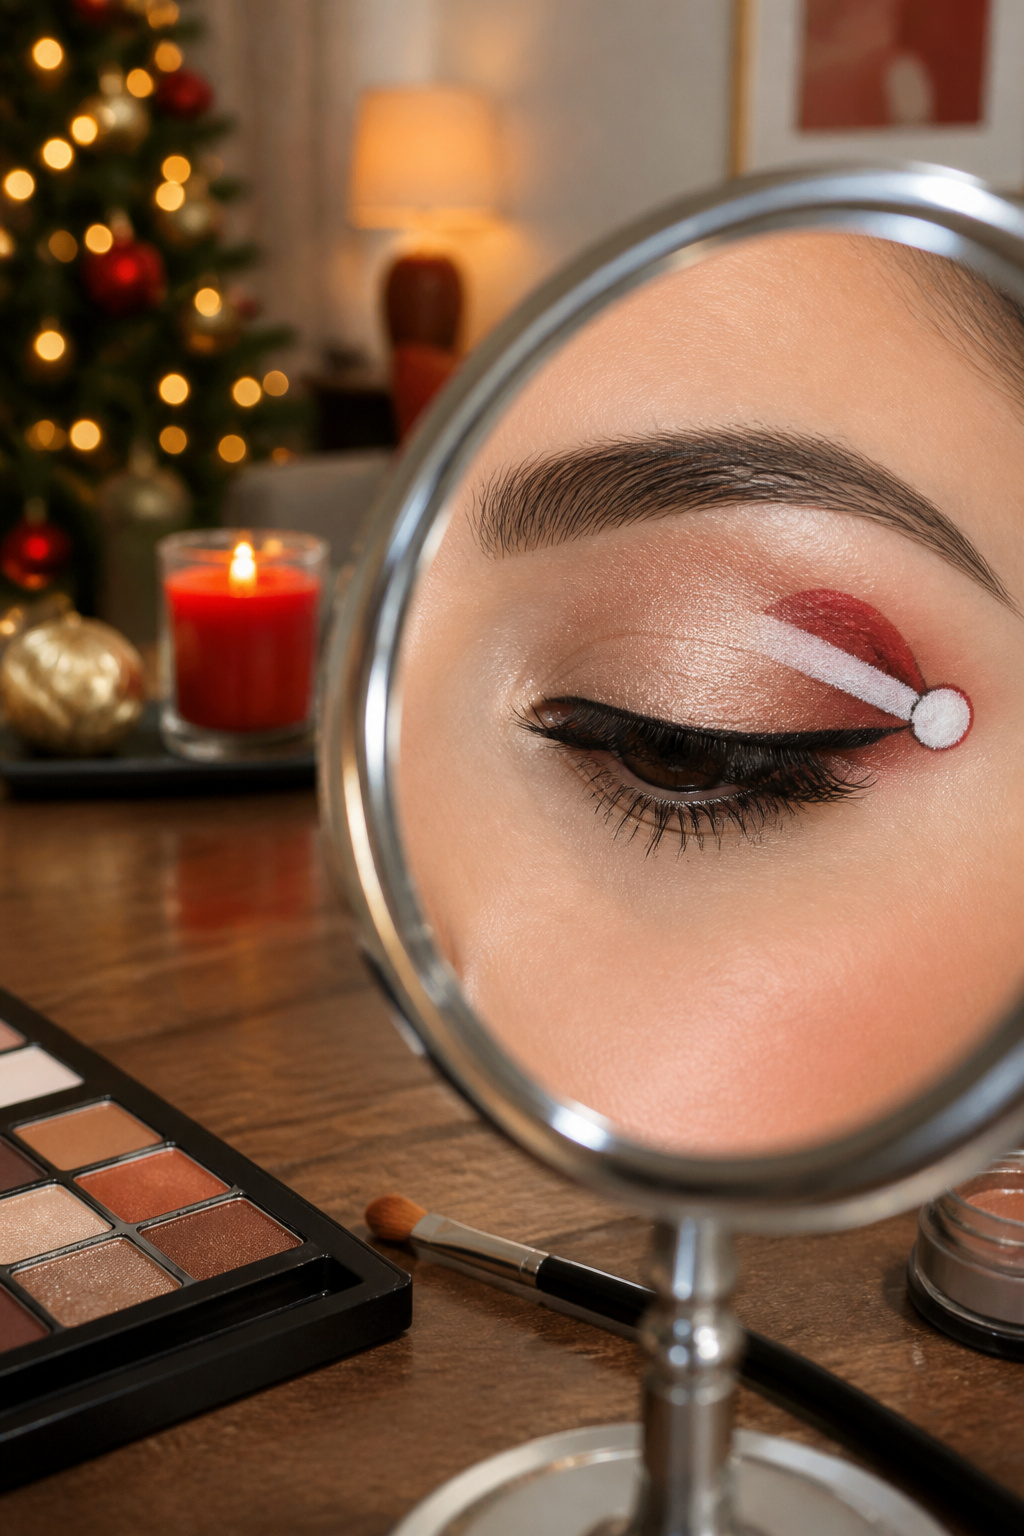
This version keeps the Santa hat motif but shrinks it to the outer corner alone, which changes everything about how wearable it feels. The full-lid design reads costume; this reads like eyeliner that happened to dress up for a party.
You will need the same three colors: red, white, and black. The difference is scale. Work under a magnifying mirror, and use a liner brush with no more than five hairs free at the tip; anything fuller paints a thumbprint where you wanted a silhouette. Lay the red dome first, add the white trim as a single curved stroke above it, and mark the black pom with the point of a pencil, not a brush.
The outer corner fights you more than the lid center. Skin there shifts every time you blink, so the line you think is straight sets into a stair step. Hold your finger at the temple to anchor the skin, finish one element before you release it, then set the design immediately with a translucent powder pressed on with a flat brush. Skip the powder and the red will transfer to your brow bone within the hour; the oil in that outer fold sees to it.
24. Snowflakes and Trees Christmas Eyeshadow
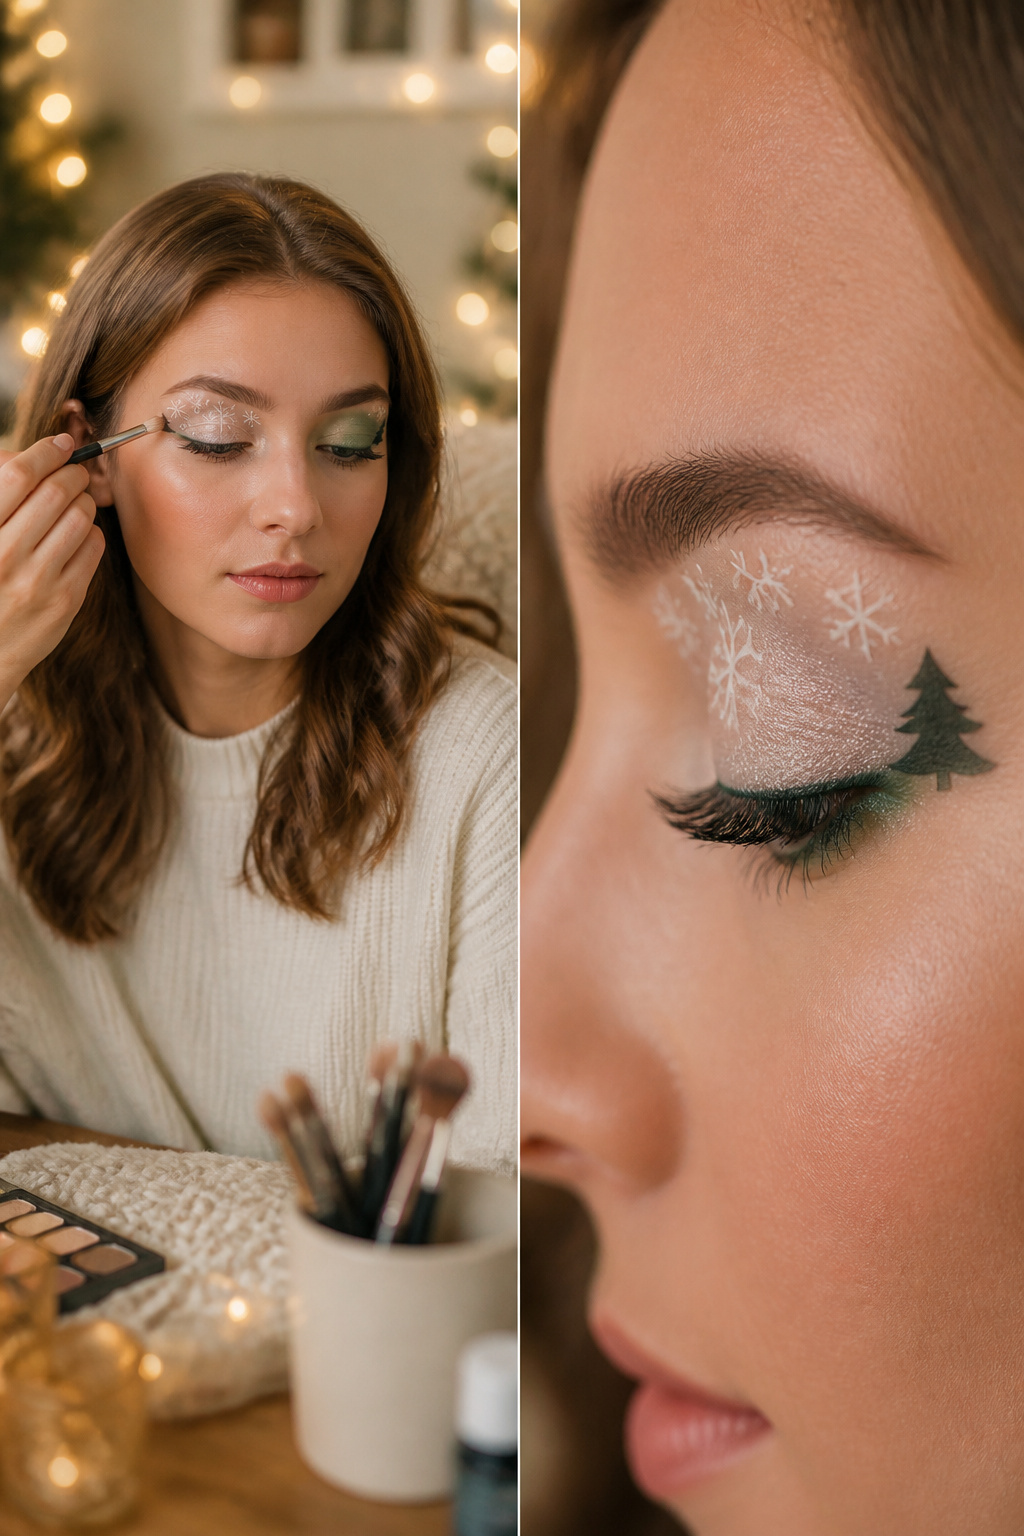
A diptych design across both eyes gives you a winter scene without crowding either lid. On one eye, cluster small white snowflakes up near the brow bone. On the other, place a single deep green tree silhouette at the outer corner. The two motifs meet only when someone sees your face straight on.
The mistake is trying to squeeze both elements onto each eye. Two snowflakes and a tree on one lid turns into smudged glitter from three feet away. You lose the shapes entirely.
Keep the palette to white and one deep tone, either green or blue. No red accents, no silver liner, no gem in the center. The negative space between the two colors does the work of separating winter sky from tree line. A flat white base on the brow bone keeps the snowflakes readable, while the darker shade needs to be opaque enough at the edges that your tree reads as a solid silhouette, not a soft blur.
Blend only where the colors meet at the crease. Any more diffusion and the two motifs dissolve into generic holiday shimmer. The discipline of those two colors is what makes the design feel intentional rather than busy.
25. Classic Christmas Eyeshadow
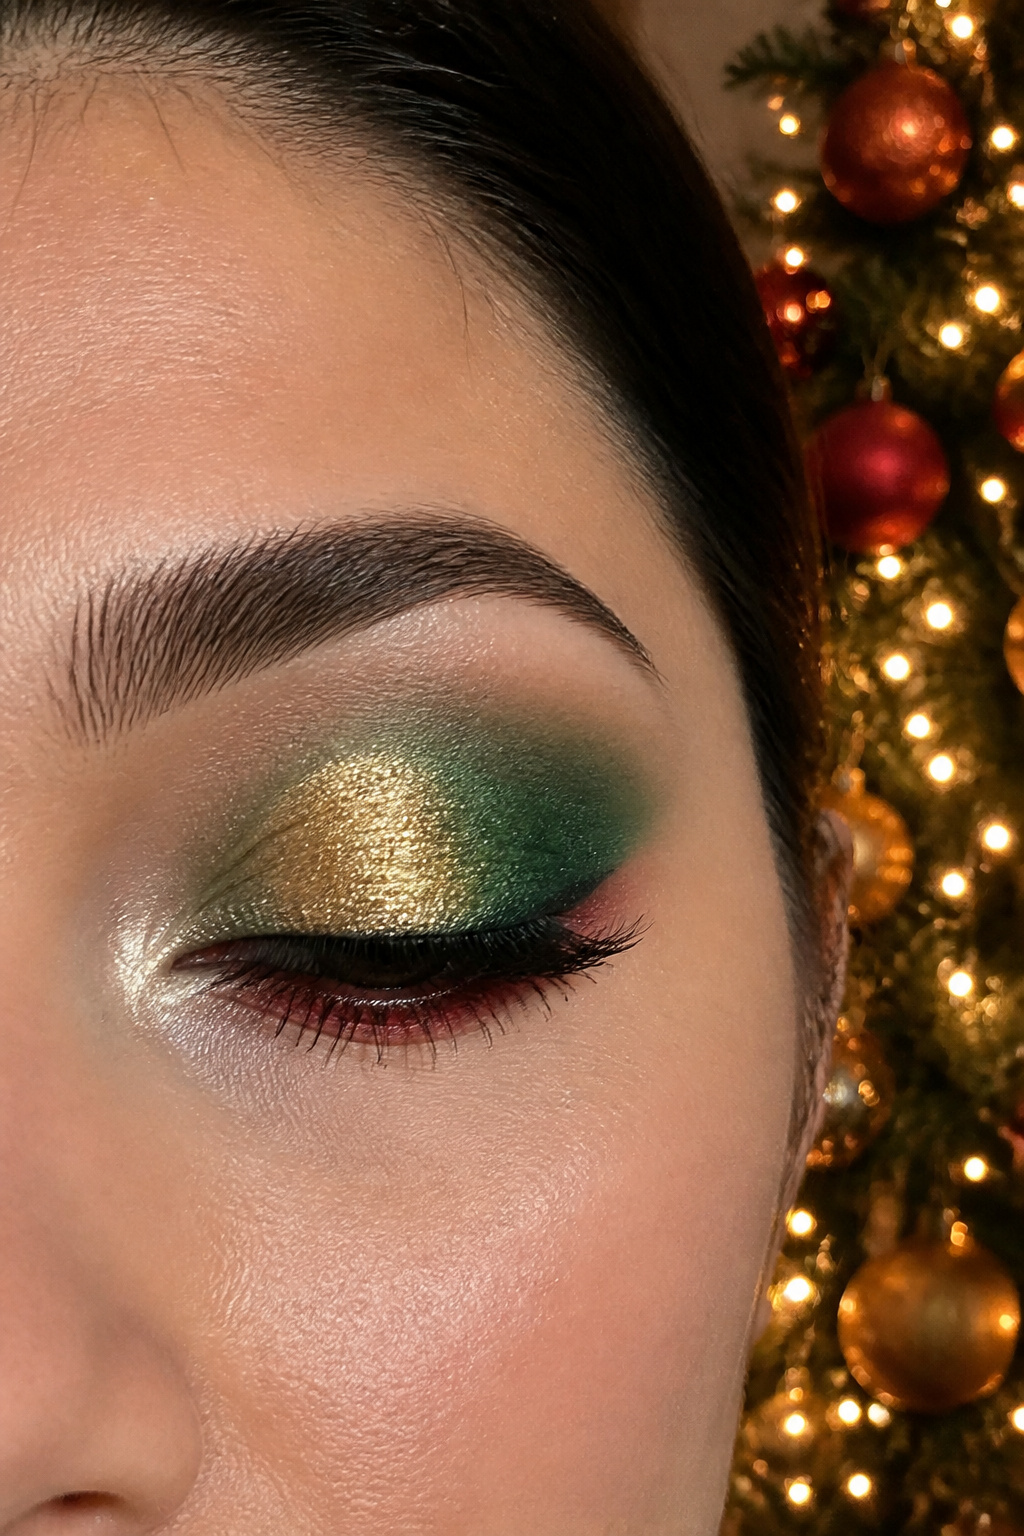
Gold on the inner corner and center of the lid, green sweeping the outer half, and a thin red line hugging the lower lash line. That is the classic Christmas eye makeup placement, and it works because green and red sit opposite each other on the color wheel. They make each other read more vivid than either manages alone, while gold sits between them to keep the shift from feeling jarring.
The Morphe 35b palette carries the right pigments for this: a true metallic gold, a deep forest green with enough yellow in it to stay warm, and a red that leans brick rather than orange. The mistake that undoes the look is drawing that red up onto the upper lid in the same width and intensity as the green. The two colors then fight for space instead of supporting each other, and the eye reads as irritated rather than festive. Keep red to a whisper along the lower lashes, no thicker than a pencil line, and let green own the upper lid’s outer territory.
26. Mistletoe Christmas Eyeshadow
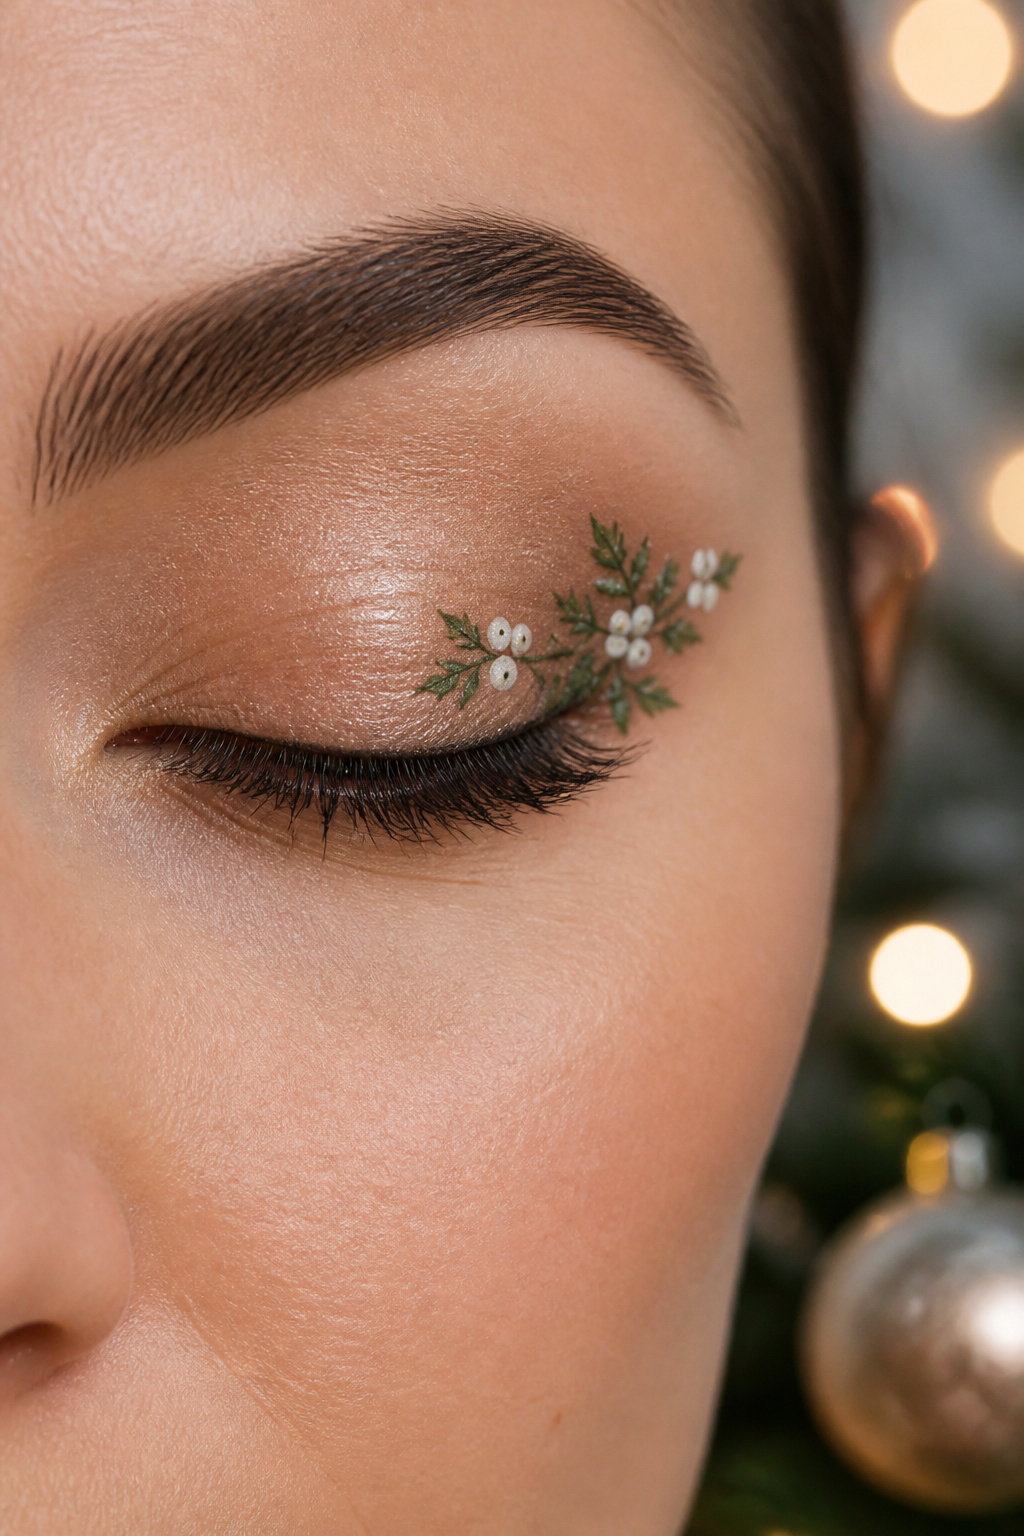
Mistletoe Christmas eyeshadow works best when you keep the botanical detail small enough to read as jewelry, not textbook illustration. Start with a matte neutral base across the lid and lower lash line so the green and white have something quiet to sit on. A fine-tipped brush and a green cream shadow give you the control you need for leaf shapes no larger than a grain of rice.
Placement changes how bold the look reads. Cluster three to five leaves with two to three white berry dots at the outer corner and you get a subtle accent that catches light when you turn your head. Trail the same small leaves along the lower lash line and the detail becomes visible straight on, which suits a party where you are not relying on profile angles.
The mistake is scale and count. Leaves drawn too large dominate the eye instead of decorating it. More than five leaves or more than three berries shifts from intentional accent into something that looks like you are wearing a pressed plant. Stay small, stay sparse, and the mistletoe registers as a clever Christmas reference rather than a costume choice.
Brushes and Blending Methods
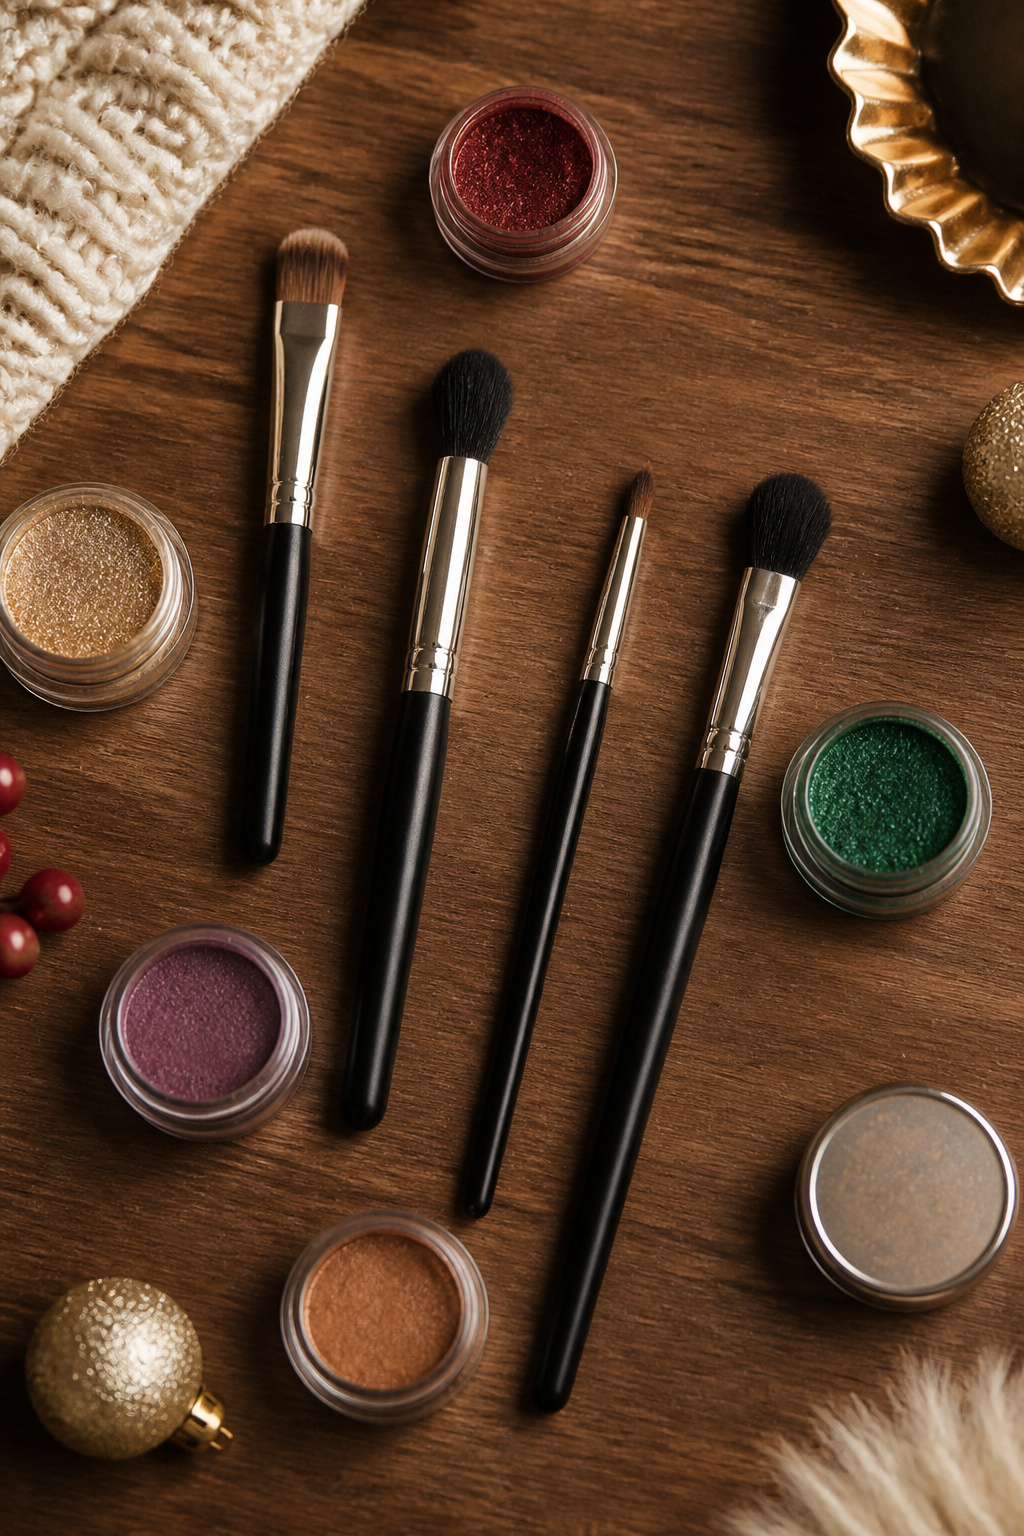
The right tools separate a clean Christmas eye makeup look from a messy one. You need four brush types: a small flat shader for packing pigment onto the lid, a fluffy blending brush for softening edges, a fine detail brush for drawing snowflakes or starbursts, and a small dense blending brush for moving between colors without dragging pigment where it does not belong.
The clean-brush rule keeps colors crisp. Work in small circles exactly where two shades meet, and stop there. Do not sweep across the whole lid; that is how red bleeds into green and turns into mud. A clean, dedicated brush for each color transition is non-negotiable. Using the same brush for multiple shades without wiping it first is the fastest way to ruin a look, and it happens because it feels faster at the time. It is not.
Yuletide Color Themes
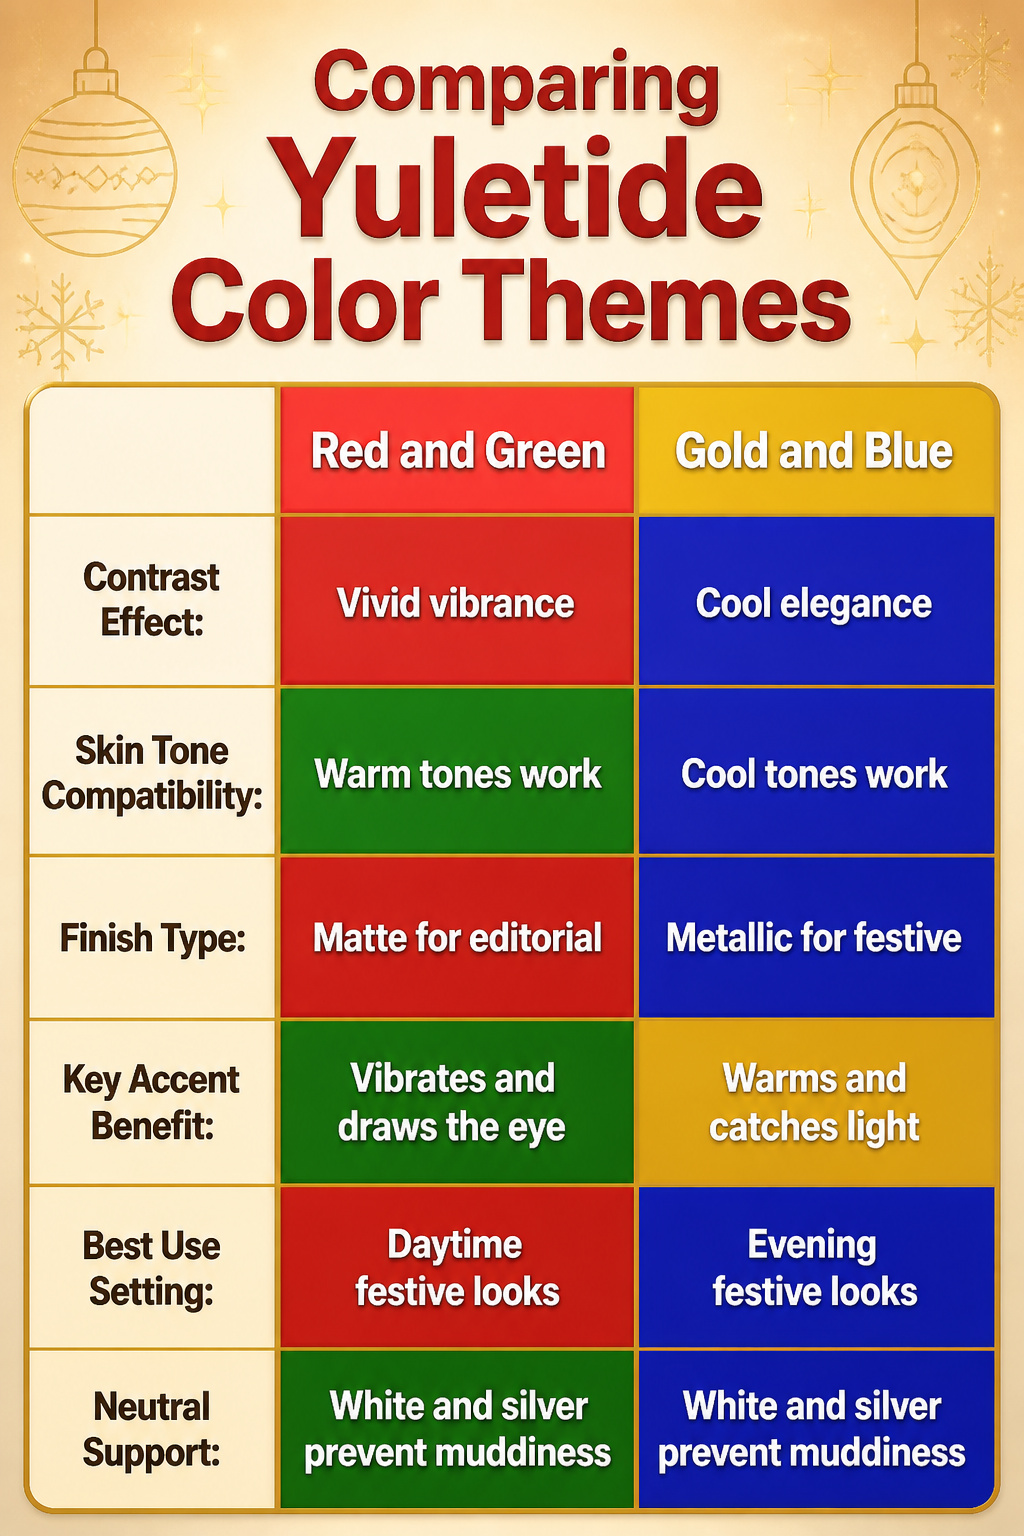
Red and green sit opposite each other on the color wheel, which means they vibrate when placed side by side and draw the eye faster than any other pairing. That vibration is why Christmas palettes feel immediately festive, not merely colorful. Gold warms the combination and catches light across a crowded room; blue steps in for evening looks where you want cool distance rather than warmth. White and silver work as neutrals here, but they serve a specific purpose: they keep red and green from muddying into brown where they meet on the lid.
Your skin tone points toward which theme will read as intentional rather than costume. Warm undertones tend to look healthy in red and gold; cool undertones settle into blue and silver without fighting the complexion. The rule bends, though. A warm-skinned person can wear a midnight blue shadow if the gold accent sits at the inner corner, and a cool tone can carry brick-red liner if the finish is sheer.
Matte red and matte green read editorial; metallic or shimmer finishes read holiday. For Christmas eye makeup specifically, the reflective quality matters more than pigment density. A metallic green catches the tree lights. A matte green just looks dark.
Step-by-Step Tutorial Structure
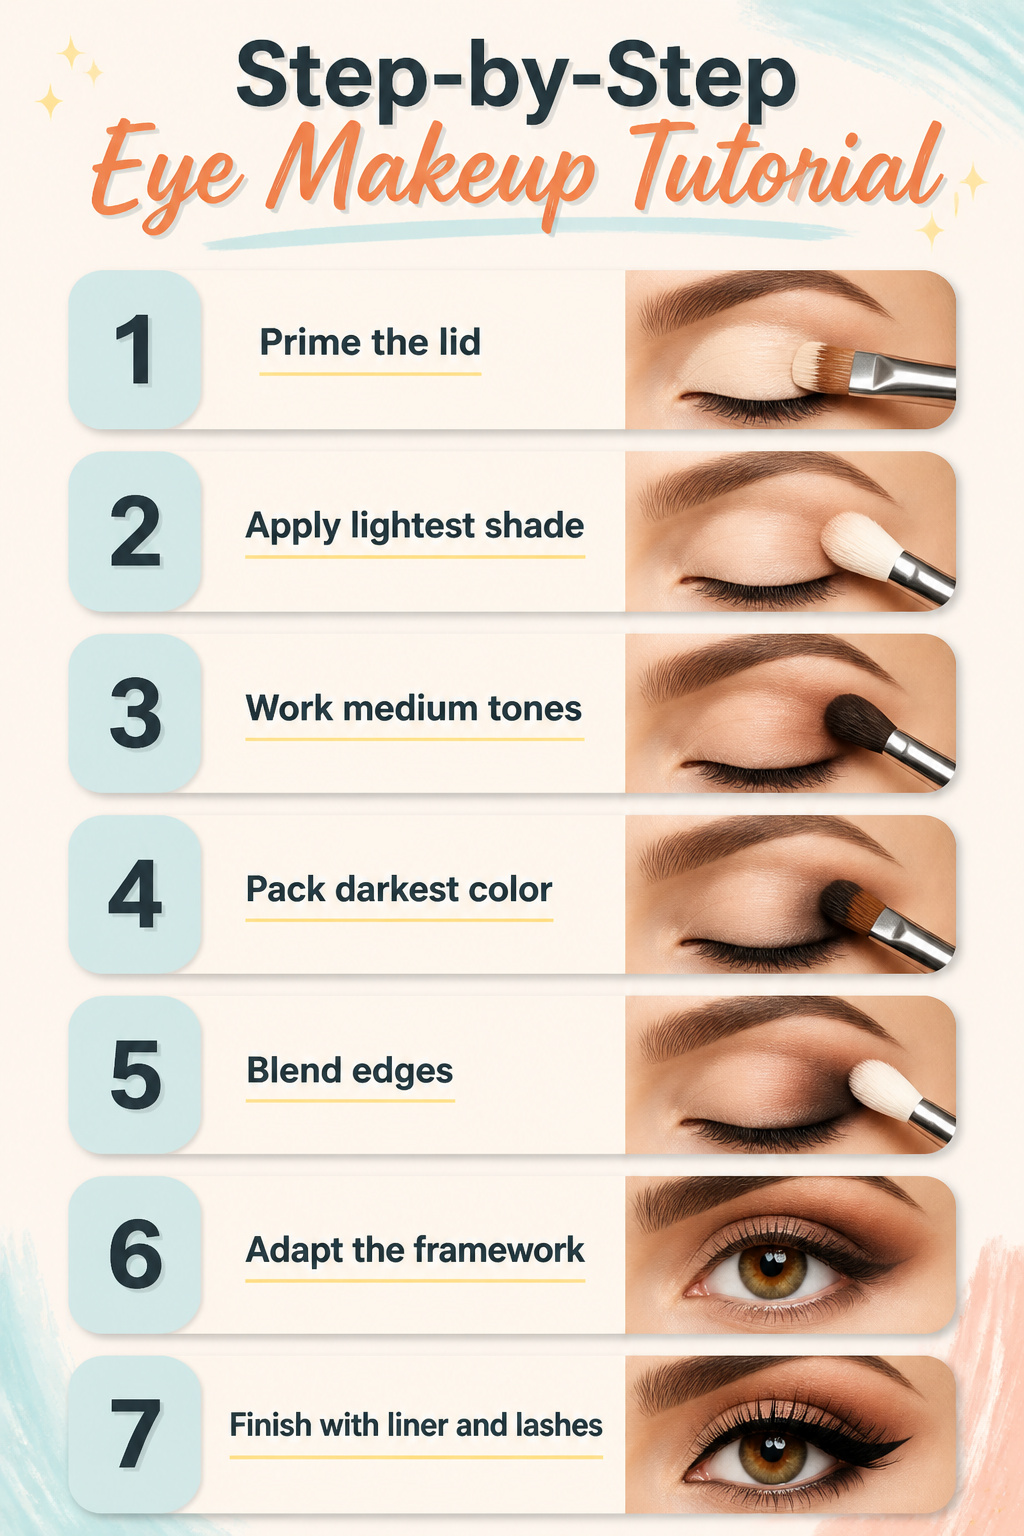
- Prime the lid with a thin layer of primer and set it with translucent powder before any color touches the skin. Skip this step and every layer after will grab unevenly, leaving you with patchy pigment that no amount of blending fixes.
- Lay down the lightest shade first, sweeping it across the entire lid up to the brow bone. This gives you a clean, even base to build on and helps you see the true color of what comes next.
- Work medium tones into the crease with a smaller brush, using windshield-wiper motions. Build slowly; you can always add more, but pulling shadow back off is nearly impossible without starting over.
- Pack the darkest or most intense color onto the outer corner or the center of the lid, depending on the shape you want. Press it on rather than sweeping to keep the saturation intact.
- Blend the edges where two colors meet until no harsh lines remain. A clean blending brush with no product on it does the work better than adding more shadow.
- Adapt the framework as needed. For graphic looks, sketch the shape first with a light pencil. For glitter, tap adhesive onto the planned area before the metallic layer. For smoky eyes, swap the primer for a cream base so the dark tones have something to grip.
- Add liner if the look calls for it, then finish with mascara or false lashes. Apply mascara last; wet lashes will transfer and ruin shadow work you have already locked in.
Frequently Asked Questions
What are some easy Christmas eye makeup looks?
Easy Christmas eye makeup looks include red built in layers over a cream base, navy blue with a crisp wing, smoked-out black from a cream foundation, green with a foil metallic finish, and soft champagne shimmer blended into a matte crease. The article covers fourteen distinct styles ranging from bold neons to quiet metallics, each with a specific technique to keep application simple and the result polished. A damp brush or fingertip application replaces complex blending for most looks.
How do you create a Santa hat eye makeup look?
Map the hat first with white pencil directly on the lid, keeping the brim near the lash line and the pom-pom no higher than the crease. Fill the crown with red cream shadow using a small flat brush, then pack white shadow onto the brim and pom-pom with the same brush cleaned off. Outline the entire shape with black liquid liner on a fine detail brush to define it against the lid. Check your work with the eye fully open before committing the liner, since drawing too large for your lid space makes the shape collapse into a red blob when you blink.
What colors are popular for Christmas eye makeup?
Red, green, blue, black, brown, pink, purple, silver, and white dominate Christmas eye makeup, with metallics and neons adding festive variation. Red stays true when layered over a cream base rather than applied directly to bare lid; green reads holiday in both deep emerald and lighter mint tones; navy and electric blue serve different purposes, the former for depth and the latter for voltage. Gold, bronze, and copper shimmers round out the palette for quieter festivity.